Amazing St. Patrick’s Day Green Velvet Cake Secrets: A Festive Dessert for Every Celebration 💚
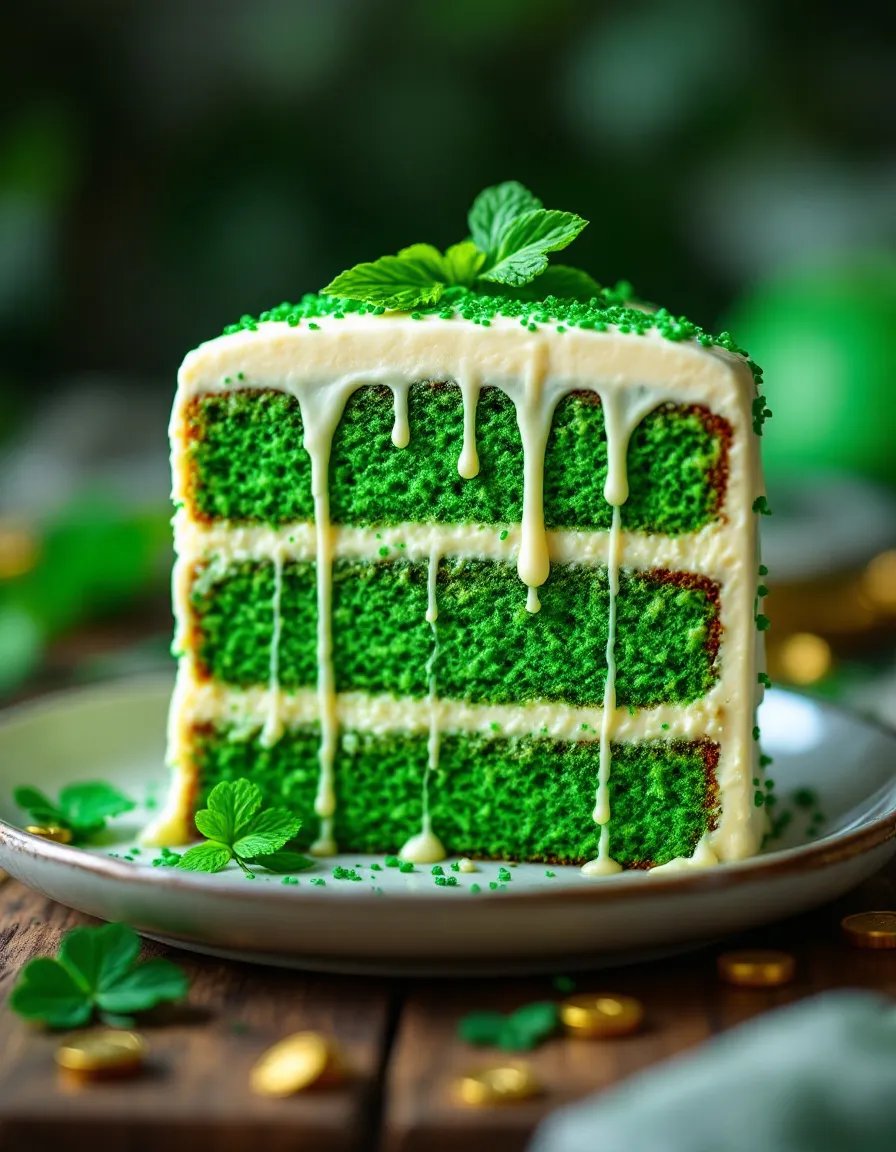
Celebrate St. Patrick’s Day in style with this Amazing Green Velvet Cake! This vibrant dessert is not only a feast for the eyes but also a delight for the taste buds. With its rich, moist crumb and luscious cream cheese frosting, this cake is perfect for any festive occasion. Whether you’re hosting a party or simply want to indulge in a slice of Irish-inspired goodness, this recipe is sure to impress. The secret lies in the perfect balance of flavors and the stunning green hue that makes it a showstopper on any dessert table.
This Green Velvet Cake is more than just a dessert—it’s a celebration of tradition and creativity. The velvety texture, combined with the tangy cream cheese frosting, creates a harmonious blend of flavors that will leave your guests craving more. The vibrant green color, achieved with natural food coloring, adds a playful touch that’s perfect for St. Patrick’s Day. Whether you’re a seasoned baker or a novice in the kitchen, this recipe is designed to guide you every step of the way, ensuring a flawless result every time.
Quick Recipe Highlights
- Flavor Profile: A perfect blend of rich cocoa and tangy cream cheese frosting, with a hint of vanilla for balance.
- Texture: Moist and velvety crumb with a smooth, creamy frosting that melts in your mouth.
- Aroma: The enticing scent of cocoa and vanilla fills the air as the cake bakes, creating an irresistible aroma.
- Visual Appeal: The vibrant green color makes this cake a stunning centerpiece for any St. Patrick’s Day celebration.
- Skill Level Needed: Intermediate, with clear instructions to guide you through each step.
- Special Equipment: Stand mixer or hand mixer, cake pans, and a piping bag for frosting.
Recipe Overview
- Difficulty Level: This recipe is perfect for bakers with some experience, as it involves layering and frosting techniques.
- Category: Dessert, perfect for celebrations and special occasions.
- Cuisine: Inspired by traditional Southern red velvet cake, with a festive Irish twist.
- Cost: Affordable, with most ingredients readily available in your pantry.
- Season: Ideal for spring celebrations, especially St. Patrick’s Day.
- Occasion: Perfect for parties, family gatherings, or as a special treat for St. Patrick’s Day.
Why You’ll Love This Recipe
This Amazing Green Velvet Cake is a crowd-pleaser for many reasons. First, its vibrant green color is a fun and festive way to celebrate St. Patrick’s Day. The rich cocoa flavor combined with the tangy cream cheese frosting creates a perfect balance of sweet and tangy that will delight your taste buds. The moist, velvety texture of the cake ensures every bite is a treat.
Another reason to love this recipe is its convenience. With straightforward instructions and common ingredients, you can easily whip up this cake for any occasion. The recipe is designed to be approachable, even for those who aren’t expert bakers. Plus, the cake can be made ahead of time, making it a stress-free option for entertaining.
Nutritionally, this cake is a treat that can be enjoyed in moderation. While it’s indulgent, you can make small adjustments, such as using low-fat cream cheese or reducing the sugar, to suit your dietary preferences. The cake also provides a fun way to incorporate a bit of festive spirit into your diet.
Socially, this cake is a winner. It’s a conversation starter at any gathering, and its stunning appearance makes it a centerpiece for your dessert table. Whether you’re hosting a St. Patrick’s Day party or bringing a dish to a potluck, this cake is sure to impress.
Finally, this recipe is cost-effective and accessible. Most of the ingredients are pantry staples, and the recipe doesn’t require any expensive or hard-to-find items. This makes it an excellent choice for anyone looking to create a show-stopping dessert without breaking the bank.
Historical Background and Cultural Significance
The Green Velvet Cake is a festive twist on the classic Southern red velvet cake, which has a rich history dating back to the 19th century. Originally, red velvet cake was made with cocoa powder, buttermilk, and vinegar, which reacted to create a reddish hue. Over time, food coloring was added to enhance the color, making it a staple at celebrations.
The green version of this cake has become synonymous with St. Patrick’s Day, a holiday that celebrates Irish culture and heritage. The vibrant green color represents the lush landscapes of Ireland and the festive spirit of the holiday. This cake has become a popular way to celebrate the occasion, blending tradition with a modern twist.
The evolution of the recipe has seen various adaptations, including the use of natural food coloring to achieve the green hue. This makes the cake not only visually appealing but also a healthier option for those looking to avoid artificial additives. The recipe has also been adapted to suit different dietary needs, with gluten-free and vegan versions becoming increasingly popular.
Regional variations of the cake include different frosting options, such as buttercream or whipped cream, and additional flavorings like mint or almond extract. These variations allow bakers to customize the cake to their preferences, making it a versatile dessert for any occasion.
Ingredient Deep Dive
Cocoa Powder
Cocoa powder is a key ingredient in this Green Velvet Cake, providing a rich, chocolatey flavor. It has a long history, dating back to ancient Mesoamerican cultures, where it was used in ceremonial drinks. Nutritionally, cocoa powder is rich in antioxidants and has been linked to various health benefits, including improved heart health and reduced inflammation. When selecting cocoa powder, opt for unsweetened, high-quality varieties for the best flavor. Store it in a cool, dry place to maintain its freshness.
Buttermilk
Buttermilk adds moisture and a slight tang to the cake, enhancing its texture and flavor. Traditionally, buttermilk was the liquid left after churning butter, but modern versions are cultured. It’s rich in probiotics, which are beneficial for gut health. When selecting buttermilk, choose fresh, high-quality options for the best results. If you don’t have buttermilk on hand, you can make a substitute by adding a tablespoon of vinegar or lemon juice to a cup of milk and letting it sit for a few minutes.
Cream Cheese
Cream cheese is the star of the frosting, providing a tangy, creamy contrast to the sweet cake. It originated in the United States in the 19th century and has since become a staple in many desserts. Nutritionally, cream cheese is high in fat and calories, but it also provides calcium and protein. When selecting cream cheese, opt for full-fat versions for the best texture and flavor. Store it in the refrigerator and use it within a week of opening for optimal freshness.
Common Mistakes to Avoid
- Overmixing the batter: This can lead to a dense, tough cake. Mix just until the ingredients are combined.
- Using expired baking powder: This can result in a flat cake. Always check the expiration date before using.
- Overbaking: This can dry out the cake. Check for doneness a few minutes before the recommended baking time.
- Not leveling the cake layers: Uneven layers can make stacking and frosting difficult. Use a serrated knife to level the tops.
- Skipping the buttermilk: Buttermilk adds moisture and tang. If you don’t have it, make a substitute as described above.
- Using cold cream cheese: Cold cream cheese can result in lumpy frosting. Let it come to room temperature before mixing.
- Not sifting the dry ingredients: Sifting ensures a smooth batter and even distribution of ingredients.
- Rushing the cooling process: Warm cake layers can melt the frosting. Allow the layers to cool completely before frosting.
Essential Techniques
Creaming Butter and Sugar
Creaming butter and sugar together is a crucial step in creating a light, fluffy cake. This process incorporates air into the batter, resulting in a tender crumb. To master this technique, ensure your butter is at room temperature and beat it with the sugar until the mixture is pale and fluffy. Avoid overmixing, as this can cause the butter to become too soft and affect the cake’s texture.
Folding in Dry Ingredients
Folding in the dry ingredients gently ensures a light, airy cake. Use a spatula to incorporate the flour mixture into the wet ingredients, using a folding motion. Overmixing at this stage can lead to a dense cake, so mix just until the ingredients are combined. This technique helps maintain the cake’s delicate texture.
Layering and Frosting
Layering and frosting the cake requires patience and precision. Start by leveling the cake layers to ensure even stacking. Apply a thin layer of frosting (a crumb coat) to seal in any crumbs, then chill the cake before applying the final layer of frosting. Use a piping bag for decorative touches, and smooth the frosting with an offset spatula for a professional finish.
Pro Tips for Perfect Green Velvet Cake
- Use gel food coloring for a vibrant green hue without altering the batter’s consistency.
- Allow all ingredients to come to room temperature before starting for even mixing.
- Line your cake pans with parchment paper to ensure easy removal and clean edges.
- Chill the cake layers before frosting to make them easier to handle and reduce crumbs.
- Use a cake turntable for smooth, even frosting application.
- Add a pinch of salt to the frosting to enhance the flavors and balance the sweetness.
- Decorate with gold sprinkles or edible glitter for a festive touch.
- Store the cake in the refrigerator, but bring it to room temperature before serving for the best texture.
Variations and Adaptations
Regional Variations
In the South, red velvet cake is often paired with pecans or walnuts for added texture. For a Green Velvet Cake, consider adding chopped pistachios or mint leaves for a fresh twist. In Ireland, you might find versions with a hint of whiskey in the frosting for an authentic Irish flavor.
Seasonal Adaptations
For spring, consider adding fresh berries as a garnish or incorporating lemon zest into the frosting for a bright, citrusy flavor. In the fall, you can add a touch of cinnamon or nutmeg to the batter for a warm, spiced variation.
Dietary Modifications
For a gluten-free version, use a gluten-free flour blend and ensure all other ingredients are gluten-free. For a vegan option, substitute the buttermilk with a plant-based alternative and use vegan cream cheese and butter. You can also reduce the sugar or use a sugar substitute for a lower-calorie version.
Serving and Presentation Guide
When serving your Green Velvet Cake, presentation is key. Start by placing the cake on a decorative cake stand or platter. Use a sharp knife to slice clean, even pieces, wiping the blade between cuts for neat edges. Garnish with fresh mint leaves, edible flowers, or gold sprinkles for a festive touch. Serve with a dollop of whipped cream or a scoop of vanilla ice cream for an extra indulgent treat.
For a modern twist, consider serving individual mini cakes or cupcakes for easy portion control and a fun presentation. If you’re hosting a large gathering, a tiered cake display can make a stunning centerpiece. Remember to consider the temperature when serving—room temperature is ideal for the best texture and flavor.
Wine and Beverage Pairing
Pair your Green Velvet Cake with a sweet dessert wine like Moscato or a rich port for a luxurious treat. For non-alcoholic options, consider serving with a cup of freshly brewed coffee or a creamy hot chocolate. The bold flavors of the cake pair well with the bitterness of coffee, creating a balanced and satisfying combination.
If you’re serving the cake at a St. Patrick’s Day celebration, consider pairing it with a traditional Irish coffee for a festive touch. The warmth of the coffee and the richness of the whiskey complement the cake’s flavors beautifully. For a refreshing option, serve with a glass of cold milk or a mint-infused iced tea.
Storage and Shelf Life
To store your Green Velvet Cake, cover it tightly with plastic wrap or place it in an airtight container. It can be kept at room temperature for up to two days, but for longer storage, refrigerate for up to five days. The cake can also be frozen for up to three months—wrap individual slices in plastic wrap and place them in a freezer-safe container.
When ready to serve, thaw the cake in the refrigerator overnight and bring it to room temperature before serving. If the frosting has softened, you can re-whip it briefly to restore its texture. Always check for signs of spoilage, such as an off smell or mold, before consuming.
Make Ahead Strategies
This Green Velvet Cake is perfect for making ahead of time. You can bake the cake layers up to two days in advance and store them wrapped in plastic wrap at room temperature. The frosting can also be prepared ahead and stored in the refrigerator for up to three days. When ready to assemble, let the frosting come to room temperature and give it a quick whip to restore its texture.
For even more convenience, you can assemble the entire cake a day before serving. Store it in the refrigerator, covered with a cake dome or plastic wrap, and bring it to room temperature before serving. This make-ahead strategy ensures a stress-free baking experience and allows the flavors to meld together beautifully.
Scaling Instructions
If you need to adjust the recipe for a smaller or larger gathering, scaling is simple. For a half batch, halve all the ingredients and use smaller cake pans. Baking time may be slightly reduced, so keep an eye on the cake and check for doneness a few minutes early.
For a double batch, double all the ingredients and use additional cake pans. You may need to bake the layers in batches if your oven can’t accommodate multiple pans at once. Ensure even baking by rotating the pans halfway through the baking time. Adjust the frosting quantity accordingly to ensure you have enough to cover the additional layers.
Nutritional Deep Dive
This Green Velvet Cake is a treat that can be enjoyed in moderation. A single slice contains approximately 350-400 calories, with a balance of carbohydrates, fats, and proteins. The cake provides a small amount of dietary fiber from the flour and cocoa powder, and the cream cheese frosting adds a dose of calcium.
While the cake is indulgent, you can make healthier substitutions, such as using whole wheat flour or reducing the sugar. The buttermilk adds probiotics, which are beneficial for gut health, and the cocoa powder provides antioxidants. For those watching their calorie intake, consider smaller portion sizes or sharing a slice with a friend.
Dietary Adaptations
Gluten-Free
For a gluten-free version, use a gluten-free flour blend and ensure all other ingredients are gluten-free. The texture may be slightly denser, but the flavor will remain delicious. Be sure to check the labels on your cocoa powder and food coloring to ensure they are gluten-free.
Dairy-Free
To make this cake dairy-free, substitute the buttermilk with a plant-based alternative like almond or soy milk mixed with a tablespoon of vinegar. Use dairy-free cream cheese and butter for the frosting. The cake will still be moist and flavorful, with a slight tang from the dairy-free buttermilk substitute.
Vegan
For a vegan version, replace the eggs with a flax or chia egg (1 tablespoon ground flax or chia seeds mixed with 3 tablespoons water per egg). Use plant-based buttermilk and dairy-free cream cheese and butter for the frosting. The cake will be just as moist and delicious, with a slight nutty flavor from the flax or chia.
Troubleshooting Guide
Texture Issues
If your cake turns out dry, it may have been overbaked. Check for doneness a few minutes early and use an oven thermometer to ensure accurate baking temperature. If the cake is too dense, you may have overmixed the batter or used too much flour. Measure your ingredients carefully and mix just until combined.
Flavor Balance
If the cake is too sweet, reduce the sugar in the batter or frosting. If it lacks flavor, add a bit more cocoa powder or a splash of vanilla extract. Taste the batter before baking and adjust the seasonings as needed.
Temperature Problems
If your frosting is too soft, chill it in the refrigerator for a few minutes before using. If the cake layers are too warm, they can melt the frosting. Allow the layers to cool completely before assembling the cake.
Recipe Success Stories
Many bakers have shared their success stories with this Green Velvet Cake recipe. One reader mentioned how the cake was a hit at their St. Patrick’s Day party, with guests raving about the moist texture and vibrant color. Another baker shared how they adapted the recipe to be gluten-free, and it turned out perfectly, with no one noticing the difference.
One community member even used the cake as the centerpiece for a themed birthday party, adding gold dust and edible glitter for a magical touch. The recipe has also been praised for its clear instructions, making it accessible for bakers of all skill levels. Whether you’re a seasoned pro or a beginner, this cake is sure to bring joy to your celebrations.
Frequently Asked Questions
Can I use natural food coloring?
Yes, you can use natural food coloring made from spinach or spirulina for a healthier option. However, the color may not be as vibrant as with gel food coloring.
Can I make this cake ahead of time?
Absolutely! You can bake the cake layers up to two days in advance and store them wrapped in plastic wrap. The frosting can also be made ahead and stored in the refrigerator.
How do I prevent my cake from sticking to the pan?
Line your cake pans with parchment paper and grease the sides with butter or cooking spray. This will ensure easy removal and clean edges.
Can I freeze this cake?
Yes, you can freeze the cake layers wrapped in plastic wrap and placed in a freezer-safe container for up to three months. Thaw in the refrigerator before assembling and frosting.
What can I use instead of buttermilk?
You can make a buttermilk substitute by adding a tablespoon of vinegar or lemon juice to a cup of milk and letting it sit for a few minutes.
How do I achieve a smooth frosting?
Ensure your cream cheese and butter are at room temperature before mixing. Use a stand mixer or hand mixer to whip the frosting until smooth and creamy.
Can I make this cake gluten-free?
Yes, use a gluten-free flour blend and ensure all other ingredients are gluten-free. The texture may be slightly denser, but the flavor will remain delicious.
How do I store leftovers?
Store the cake in an airtight container in the refrigerator for up to five days. Bring it to room temperature before serving for the best texture.
Can I use a different frosting?
Yes, you can use buttercream or whipped cream frosting if you prefer. However, cream cheese frosting pairs beautifully with the cake’s flavors.
How do I prevent my cake from sinking in the middle?
Ensure your baking powder is fresh and not expired. Avoid overmixing the batter, and do not open the oven door too early during baking.
Additional Resources
For more baking inspiration, check out our collection of festive dessert recipes. If you’re new to baking, our beginner’s guide to cake decorating is a great place to start. For tips on selecting the best ingredients, read our guide to pantry essentials. And if you’re looking for more St. Patrick’s Day ideas, explore our collection of Irish-inspired recipes.
Join the Conversation
We love hearing from our readers! Share your Green Velvet Cake creations on social media using the hashtag #GreenVelvetCake. Tag us in your photos for a chance to be featured on our page. Leave a comment below with your tips, variations, or questions. And don’t forget to rate the recipe and let us know how it turned out for you!
The Recipe
Amazing St. Patrick’s Day Green Velvet Cake
Serves: 12
Prep Time: 30 mins
Cook Time: 25 mins
Total Time: 55 mins
Kitchen Equipment Needed
- Stand mixer or hand mixer
- Three 8-inch round cake pans
- Parchment paper
- Offset spatula
- Piping bag (optional)
Ingredients
- 2 1/2 cups all-purpose flour
- 1 1/2 cups granulated sugar
- 1 tsp baking soda
- 1 tsp salt
- 1 tsp cocoa powder
- 1 1/2 cups vegetable oil
- 1 cup buttermilk, room temperature
- 2 large eggs, room temperature
- 2 tbsp green gel food coloring
- 1 tsp vanilla extract
- 1 tsp white vinegar
Directions
- Preheat your oven to 350°F (175°C). Grease and line three 8-inch round cake pans with parchment paper.
- In a large bowl, whisk together the flour, sugar, baking soda, salt, and cocoa powder.
- In a separate bowl, combine the vegetable oil, buttermilk, eggs, food coloring, vanilla extract, and vinegar. Mix until well combined.
- Gradually add the wet ingredients to the dry ingredients, mixing until just combined. Do not overmix.
- Divide the batter evenly between the prepared pans and smooth the tops with a spatula.
- Bake for 25-30 minutes, or until a toothpick inserted into the center comes out clean.
- Allow the cakes to cool in the pans for 10 minutes, then transfer to a wire rack to cool completely.
- Once cooled, frost the cake with cream cheese frosting and decorate as desired.
Recipe Notes
- For a deeper green color, add an extra drop of green food coloring.
- If you don’t have buttermilk, you can make a substitute by adding 1 tbsp of vinegar or lemon juice to 1 cup of milk.
- Store the cake in the refrigerator, but bring it to room temperature before serving for the best texture.

