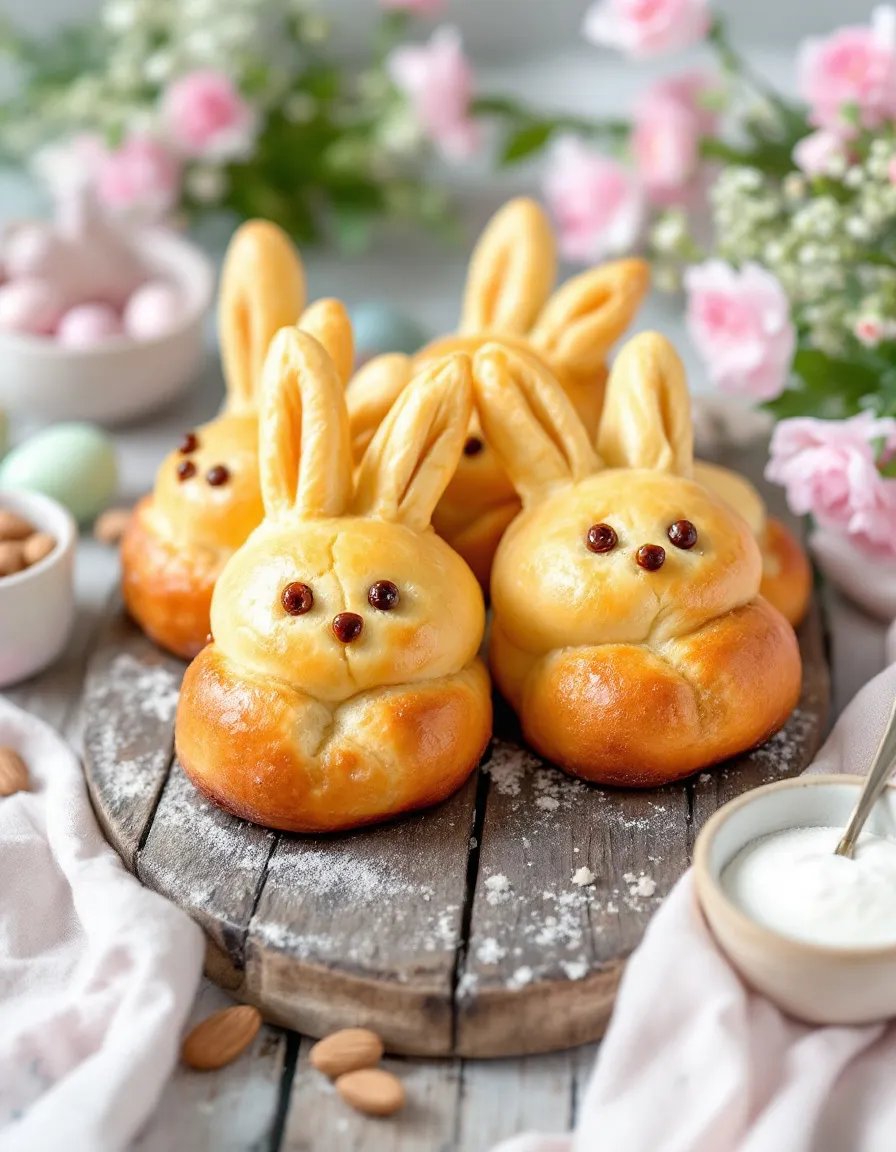
Bunny Buns: Soft and Fluffy Easter-Inspired Sweet Rolls
These adorable Bunny Buns are the perfect addition to your Easter brunch or springtime gathering. Soft, pillowy, and lightly sweetened, these yeast rolls are shaped like cute little bunnies that will delight both kids and adults alike. The dough is enriched with milk and butter for a tender crumb, while a hint of vanilla adds a delicate aroma that fills your kitchen as they bake.
What makes these homemade bunny-shaped rolls special is their versatility. Serve them warm with honey butter for breakfast, use them as dinner rolls, or transform them into sweet treats with a dusting of powdered sugar. The shaping technique is simpler than it looks, and the results are guaranteed to bring smiles to your table. Whether you’re hosting an Easter celebration or just want to add some whimsy to your baking routine, these Bunny Buns are a joyful project with delicious rewards.
Quick Recipe Highlights
- Flavor Profile: These sweet rolls feature a delicate balance of vanilla and butter with a subtle sweetness that pairs perfectly with jam or honey.
- Texture: Light and airy with a soft, slightly chewy interior and a tender golden crust.
- Aroma: The kitchen fills with the comforting scents of warm yeast, vanilla, and caramelized butter as they bake.
- Visual Appeal: The adorable bunny shapes make these rolls as fun to look at as they are to eat, perfect for Instagram-worthy brunch spreads.
- Skill Level Needed: Basic bread-making skills required, with some patience needed for shaping the dough into bunnies.
- Special Equipment: Just a baking sheet and parchment paper – no fancy tools needed for these cute creations.
Recipe Overview
- Difficulty Level: While the dough itself is straightforward, shaping the bunnies requires some practice. The recipe is perfect for intermediate bakers looking to expand their shaping techniques.
- Category: These versatile buns work equally well as breakfast pastries, tea-time treats, or dinner rolls.
- Cuisine: Inspired by European sweet bread traditions with a playful American twist in presentation.
- Cost: Made with pantry staples, these buns are budget-friendly at about $0.25 per bun.
- Season: While perfect for spring and Easter, these buns can be enjoyed year-round with different decorations.
- Occasion: Ideal for holiday brunches, children’s parties, or as edible gifts for spring celebrations.
Why You’ll Love This Bunny Buns Recipe
The charm of these Bunny Buns begins with their irresistible appearance but continues with their delightful texture and flavor. Unlike store-bought rolls, these homemade versions have a freshness and tenderness that can’t be replicated. The dough is forgiving enough for beginners yet rewarding for experienced bakers looking to practice their shaping skills.
From a practical standpoint, these buns are incredibly versatile. The basic dough can be adapted with different flavors – add citrus zest, spices, or even chocolate chips to create variations. They freeze beautifully, meaning you can prepare them ahead for stress-free entertaining. The recipe scales easily, allowing you to make a small batch for family or dozens for a party.
Nutritionally, these homemade buns let you control the ingredients, avoiding preservatives and excessive sugars found in commercial products. Using whole milk provides calcium, while the fermentation process makes the nutrients more bioavailable. For those watching sugar intake, the recipe can be easily adjusted without sacrificing texture.
Socially, these Bunny Buns become instant conversation starters. They’re perfect for engaging children in the kitchen, teaching them basic baking skills while creating edible art. The buns make wonderful edible gifts when packaged in clear bags with spring ribbons – a homemade touch that shows care and creativity.
Economically, this recipe makes excellent use of basic pantry ingredients. A single batch yields a dozen impressive buns at a fraction of the cost of bakery versions. The dough can be made with either active dry or instant yeast, giving flexibility based on what you have available.
Historical Background and Cultural Significance
The tradition of shaped breads dates back centuries across many cultures, with animals being particularly popular motifs. In European baking, shaped rolls often marked religious holidays and seasonal celebrations. The bunny shape specifically gained popularity in America during the mid-20th century as Easter baking became more elaborate and commercialized.
Bread shaping as an art form has roots in multiple culinary traditions. German and Scandinavian bakers were particularly known for their intricate holiday bread designs. The American adaptation of these techniques merged with the growing popularity of Easter bunnies in the 1940s and 1950s, creating the perfect storm for bunny-shaped rolls to enter home kitchens.
The evolution of this recipe reflects changing home baking trends. Early versions were often simple white bread doughs shaped into rough rabbit forms. Contemporary versions like this one incorporate enriched dough techniques for superior texture and flavor. The basic formula has remained remarkably consistent, proving the timeless appeal of edible artistry.
Regional variations abound – some bakers add raisins for eyes, others use almond slices for ears. In some traditions, the bunnies are brushed with egg wash for shine, while others prefer a matte finish with milk washes. This recipe strikes a balance between tradition and modern baking science for reliable results.
Ingredient Deep Dive
Bread Flour
Bread flour’s higher protein content (12-14%) creates the perfect structure for these shaped buns. The gluten network provides elasticity needed to hold the bunny shapes during rising and baking. If unavailable, all-purpose flour can be used with slightly less tender results. For whole grain versions, substitute up to 30% of the flour with whole wheat, adding 1-2 tablespoons extra liquid.
Whole Milk
The milk’s fat content enriches the dough while the natural sugars contribute to browning. Scalding the milk (heating to 180°F then cooling) deactivates enzymes that can weaken gluten. For dairy-free versions, full-fat coconut milk or almond milk with 1 tablespoon neutral oil works well, though the flavor profile will change slightly.
Unsalted Butter
Butter adds flavor and creates a tender crumb by coating flour proteins. Using unsalted allows control over the seasoning. European-style butters (82-85% fat) produce especially luxurious results. For vegan versions, refined coconut oil or high-quality margarine can substitute in equal amounts.
Common Mistakes to Avoid
- Overproofing: Letting the shaped buns rise too long causes them to lose definition. Watch for just 1.5 times volume increase before baking.
- Incorrect flour measurement: Spoon flour into measuring cups and level – packing compacts flour leading to dense buns.
- Rushing the process: Yeast needs time to develop flavor. Don’t shortcut the bulk fermentation.
- Overhandling dough: Excessive kneading after shaping can make buns tough rather than tender.
- Inadequate egg wash: A thin, even coat gives golden color without pooling in crevices.
Essential Techniques
Dough Shaping
Mastering bunny shaping begins with properly portioned dough balls. Use a kitchen scale for accuracy – about 50g per bun. Form smooth rounds by rolling against an unfloured surface with a cupped hand. For ears, roll small pieces into tapered ropes and attach with a dab of water. The key is working quickly before the dough skins over.
Egg Washing
A proper egg wash (1 egg + 1 tbsp water, beaten) should be applied with a soft pastry brush in a thin, even layer. Apply just before baking to prevent the wash from soaking in. For extra shine, apply a second coat halfway through baking using a silicone brush to avoid deflating the buns.
Pro Tips for Perfect Bunny Buns
- Use room temperature ingredients for even mixing and proper yeast activation.
- Let shaped buns proof covered with a damp towel to prevent skin formation.
- Rotate baking sheet halfway through for even browning in home ovens.
- Add raisins or chocolate chips for eyes after baking to prevent burning.
Variations and Adaptations
Seasonal Variations
For winter holidays, shape the dough into snowmen or mittens. Add cinnamon to the dough and use currants for buttons. In summer, create turtle shapes by flattening rounds and adding head/limbs, sprinkling with cinnamon sugar for “shell” texture.
Dietary Adaptations
Gluten-free versions work well with 1:1 gluten-free flour blends plus 1 tsp xanthan gum. Vegan adaptations replace eggs in wash with plant milk or maple syrup glaze. For sugar-free, use erythritol and brush with melted butter instead of egg wash.
The Recipe
Bunny Buns
Serves: 12
Prep Time: 30 mins
Cook Time: 20 mins
Total Time: 50 mins
Kitchen Equipment Needed
- Stand mixer with dough hook (optional)
- Large mixing bowl
- Baking sheets
- Parchment paper
- Pastry brush
Ingredients
- 3 1/2 cups (420g) bread flour
- 1/4 cup (50g) granulated sugar
- 2 1/4 tsp instant yeast
- 1 tsp salt
- 1 cup (240ml) whole milk, warmed to 110°F
- 1 large egg
- 1/4 cup (56g) unsalted butter, softened
- 1 tsp vanilla extract
- 1 egg + 1 tbsp water (for egg wash)
Directions
- In mixer bowl, combine flour, sugar, yeast, and salt.
- Add warm milk, egg, butter, and vanilla. Mix until dough forms.
- Knead for 8 minutes until smooth and elastic.
- Place in greased bowl, cover, and rise for 1 hour until doubled.
- Punch down dough and divide into 12 equal portions.
- Shape each into a ball, then create ears with small dough pieces.
- Place on parchment-lined sheets, cover, and rise 30 minutes.
- Preheat oven to 375°F (190°C). Brush buns with egg wash.
- Bake 15-18 minutes until golden brown.
- Cool slightly before serving.
Recipe Notes
- For shiny tops, brush with melted butter after baking.
- Store in airtight container for up to 3 days or freeze for 1 month.
- Add 1/2 tsp cardamom or citrus zest to dough for variation.