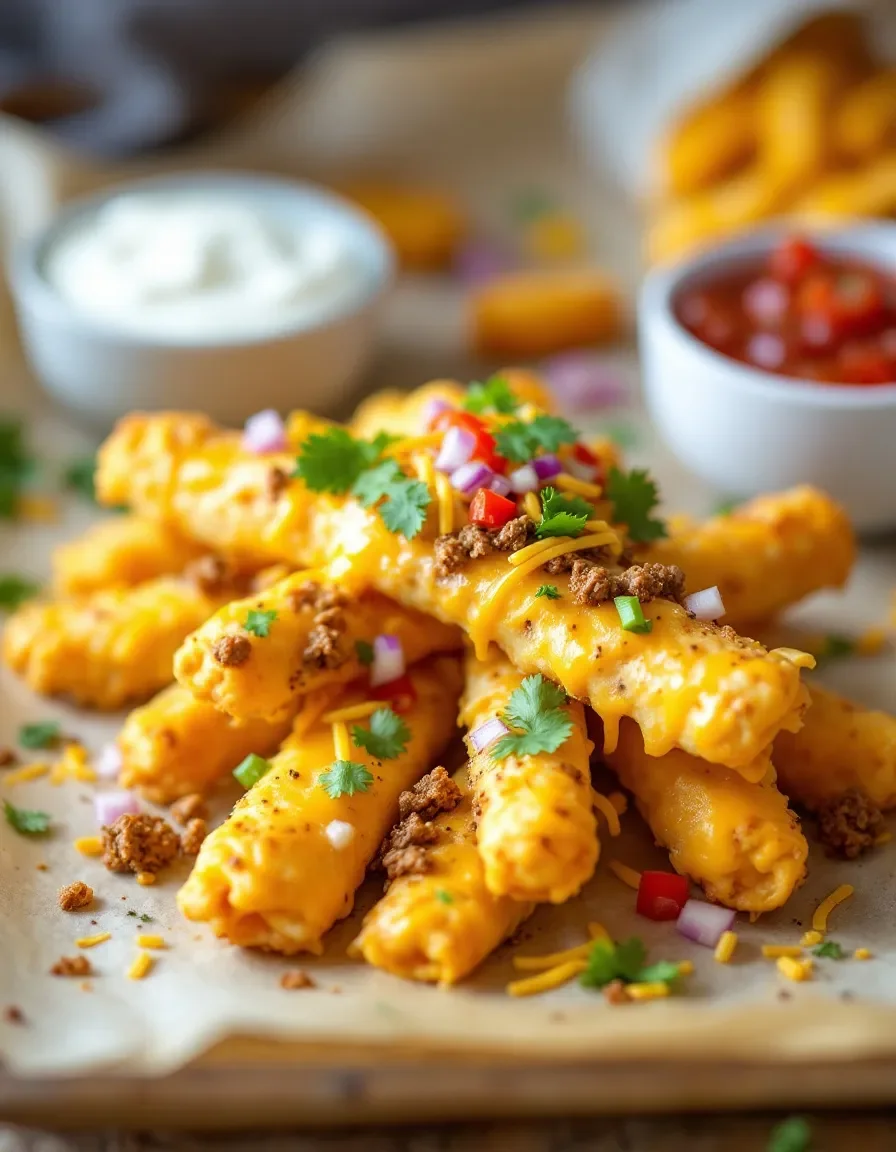
Cheesy Taco Sticks: The Ultimate Game Day Snack
These Cheesy Taco Sticks are the perfect fusion of Mexican flavors and finger-food convenience. Imagine golden-brown puff pastry wrapped around a savory filling of seasoned ground beef, melted cheese, and just the right amount of spice. They’re crispy on the outside, gooey in the middle, and packed with all the taco flavors you love.
Whether you’re hosting a game day party, need a quick weeknight dinner, or want a fun appetizer for your next gathering, these taco sticks deliver big flavor with minimal effort. The combination of flaky pastry, seasoned meat, and melted cheese creates an irresistible texture contrast that will have everyone reaching for seconds.
Quick Recipe Highlights
- Flavor Profile: Bold taco seasoning meets creamy melted cheese with a hint of spice
- Texture: Crispy golden pastry exterior with a soft, cheesy interior
- Aroma: Warm spices, toasted cheese, and savory beef fill your kitchen
- Visual Appeal: Golden brown sticks with melty cheese peeking through
- Skill Level Needed: Perfect for beginners with simple assembly
- Special Equipment: Just a baking sheet and parchment paper
The Recipe
Cheesy Taco Sticks
Serves: 6
Prep Time: 15 mins
Cook Time: 20 mins
Total Time: 35 mins
Kitchen Equipment Needed
- Large skillet
- Baking sheet
- Parchment paper
- Mixing bowls
- Pastry brush
Ingredients
- 1 lb ground beef
- 1 packet taco seasoning
- 1 sheet puff pastry, thawed
- 1 cup shredded cheddar cheese
- 1 cup shredded Monterey Jack cheese
- 1 egg (for egg wash)
- 2 tbsp water
- Optional toppings: salsa, sour cream, guacamole
Directions
- Preheat oven to 400°F (200°C) and line a baking sheet with parchment paper.
- In a skillet over medium heat, brown the ground beef until no longer pink. Drain excess fat.
- Add taco seasoning and prepare according to package directions. Set aside to cool slightly.
- Roll out puff pastry sheet on a lightly floured surface into a 12×9 inch rectangle.
- Spread the cooled taco meat evenly over the pastry, leaving a 1-inch border.
- Sprinkle both cheeses evenly over the meat.
- Starting from the long side, tightly roll the pastry into a log. Seal the edge with water.
- Cut into 1-inch thick sticks and place on prepared baking sheet, cut side up.
- Whisk egg with 2 tbsp water to make an egg wash. Brush over the tops of each stick.
- Bake for 18-20 minutes until golden brown and puffed.
- Serve warm with your favorite dipping sauces.
Recipe Notes
- For extra crispiness, bake on a wire rack set over the baking sheet.
- Substitute ground turkey or chicken for a lighter version.
- Add diced jalapeños to the filling for more heat.
Why You’ll Love These Cheesy Taco Sticks
The magic of these Cheesy Taco Sticks lies in their perfect balance of textures and flavors. The flaky puff pastry provides a buttery crunch that gives way to the savory, well-seasoned beef filling. Melted cheese binds everything together while adding its own rich, creamy dimension. Each bite delivers the familiar comfort of tacos in a fun, handheld format that’s perfect for parties or casual snacking.
From a practical standpoint, these taco sticks are incredibly versatile. They work equally well as appetizers, main dishes, or even next-day snacks. The recipe comes together quickly using simple ingredients, most of which you probably already have in your pantry. The assembly is straightforward enough for beginner cooks, yet the results look impressive enough for special occasions.
Nutritionally, you can customize these sticks to fit your dietary needs. Use lean ground beef or turkey to reduce fat content, load up on extra veggies in the filling, or choose reduced-fat cheese options. The portion-controlled sticks make it easy to manage serving sizes, and they pack enough protein to keep you satisfied.
For entertaining, these Cheesy Taco Sticks are a guaranteed crowd-pleaser. They’re perfect finger food for game day spreads, potlucks, or casual get-togethers. Kids and adults alike love them, and they pair wonderfully with all your favorite taco toppings and dips. Set up a DIY dipping station with salsa, guacamole, and sour cream for added fun.
Cost-wise, this recipe makes excellent use of affordable ingredients. Ground beef and basic cheeses are budget-friendly proteins, while the puff pastry elevates simple components into something special. You’ll get impressive results without expensive specialty ingredients, making this a great option for feeding a crowd without breaking the bank.
Pro Tips for Perfect Cheesy Taco Sticks
- For maximum flakiness, keep your puff pastry cold until ready to use. If it gets too warm while working with it, chill it for 10 minutes before baking.
- Drain the cooked beef well to prevent soggy pastry. Let the filling cool slightly before assembling to maintain the pastry’s texture.
- Use a sharp serrated knife to cut the log into sticks for clean cuts that won’t squish the filling.
- For extra golden color, brush the sticks with egg wash right before baking and again halfway through baking.
- Let baked sticks rest for 5 minutes before serving – the cheese will set slightly for perfect pull-apart texture.
- For crispier sticks, bake them on a wire rack set over your baking sheet to allow air circulation.
Frequently Asked Questions
Can I make Cheesy Taco Sticks ahead of time?
Yes! You can assemble the sticks up to a day in advance and refrigerate them until ready to bake. You can also freeze the unbaked sticks for up to 3 months – bake from frozen, adding a few extra minutes to the cooking time.
What dipping sauces work best?
Traditional taco accompaniments like salsa, guacamole, and sour cream are perfect. For something different, try ranch dressing, queso dip, or a spicy chipotle mayo.
Can I use other meats?
Absolutely! Ground turkey, chicken, or even plant-based crumbles work well. Adjust cooking times as needed based on your protein choice.
How do I store leftovers?
Store cooled sticks in an airtight container in the refrigerator for up to 3 days. Reheat in a 350°F oven for best texture.
Can I make these gluten-free?
Yes, use gluten-free puff pastry (available in some specialty stores) and ensure your taco seasoning is gluten-free.