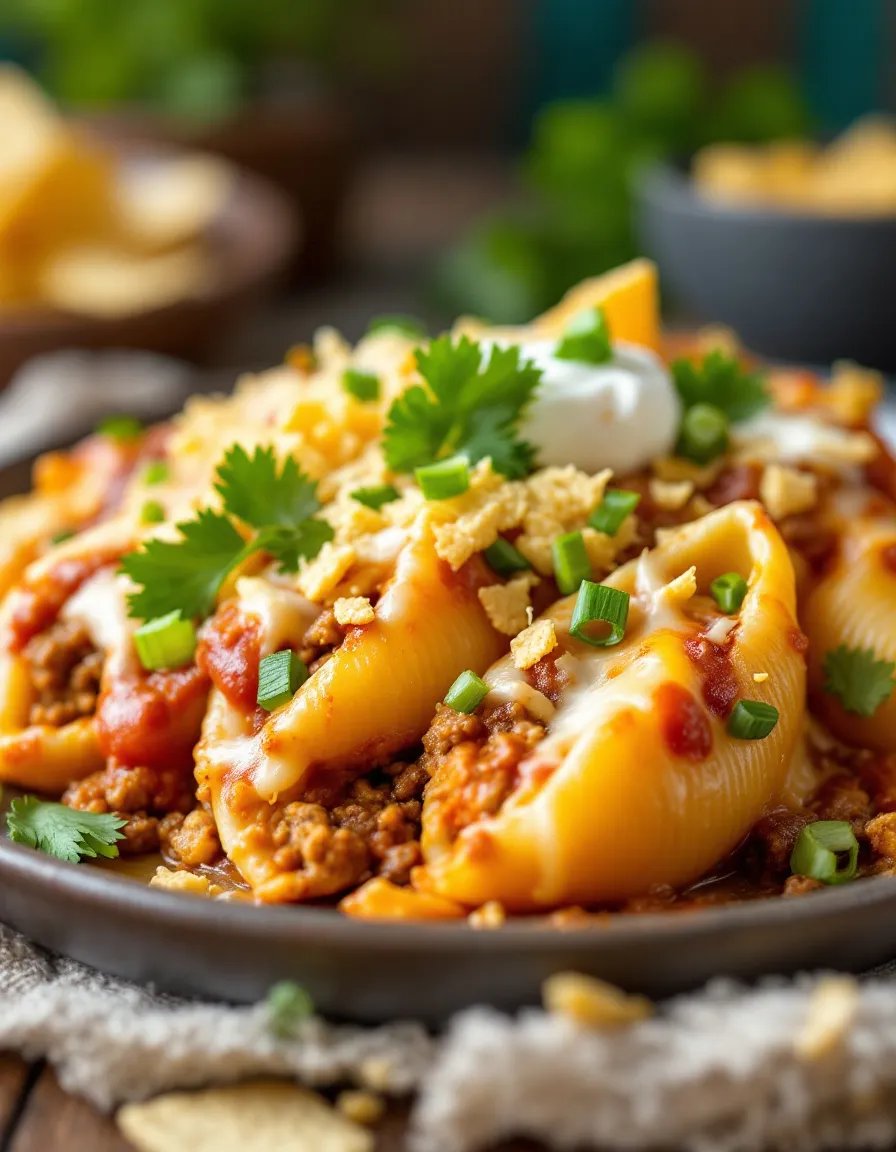
Cheesy Taco Stuffed Pasta Shells – Easy & Delicious!
If you’re looking for a crowd-pleasing dish that combines the best of tacos and pasta, these Cheesy Taco Stuffed Pasta Shells are your answer! Imagine tender jumbo pasta shells stuffed with a savory taco-spiced filling, smothered in melted cheese, and baked to golden perfection. This recipe is perfect for busy weeknights, family gatherings, or even meal prep. It’s a fun twist on traditional tacos that will have everyone coming back for seconds.
The combination of flavors and textures in this dish is simply irresistible. The creamy cheese, hearty taco filling, and slightly crispy pasta edges create a symphony of deliciousness. Plus, it’s incredibly easy to make, even for beginner cooks. Whether you’re serving it at a party or enjoying it as a cozy dinner, these stuffed pasta shells are sure to become a favorite in your recipe rotation.
Quick Recipe Highlights
- Flavor Profile: Bold taco spices, creamy cheese, and a hint of smokiness make this dish a flavor explosion.
- Texture: Soft pasta shells with a hearty, cheesy filling and a slightly crispy top layer.
- Aroma: The warm, inviting scent of taco seasoning and melted cheese will fill your kitchen.
- Visual Appeal: Golden, bubbly cheese and colorful garnishes make this dish Instagram-worthy.
- Skill Level Needed: Perfect for beginners, with simple steps and minimal prep work.
- Special Equipment: Just a baking dish and a pot for boiling pasta—no fancy tools required!
Recipe Overview
- Difficulty Level: This recipe is beginner-friendly, with straightforward steps and easy-to-find ingredients.
- Category: Main dish, perfect for dinner or potlucks.
- Cuisine: A fusion of Italian and Mexican flavors, combining pasta shells with taco-inspired fillings.
- Cost: Budget-friendly, using pantry staples and affordable ingredients.
- Season: Great year-round, but especially comforting in cooler months.
- Occasion: Ideal for family dinners, game day gatherings, or meal prep.
Why You’ll Love This Recipe
These Cheesy Taco Stuffed Pasta Shells are a game-changer for anyone who loves bold flavors and easy recipes. The combination of taco seasoning, ground beef, and melted cheese creates a dish that’s both comforting and exciting. Plus, it’s a great way to sneak in some veggies for picky eaters.
One of the best things about this recipe is its convenience. You can prepare the filling and stuff the shells ahead of time, making it perfect for busy weeknights. Simply pop it in the oven when you’re ready to eat, and dinner is served in no time. It’s also a fantastic dish for meal prep, as it reheats beautifully.
Nutritionally, this dish offers a good balance of protein, carbs, and fats. The ground beef provides a hearty dose of protein, while the cheese adds calcium and richness. You can easily customize it to suit your dietary needs by using lean ground turkey, plant-based meat, or even a vegetarian filling.
From a social perspective, this dish is a winner. It’s perfect for sharing at potlucks or serving at family gatherings. The colorful presentation and familiar flavors make it a hit with both kids and adults. Plus, it’s a great conversation starter—everyone will want to know how you made it!
Finally, this recipe is incredibly cost-effective. Most of the ingredients are pantry staples, and you can easily stretch the recipe to feed a crowd. It’s a delicious way to enjoy a restaurant-quality meal without breaking the bank.
Historical Background and Cultural Significance
The concept of stuffed pasta shells originates from Italian cuisine, where pasta is often filled with cheese, meat, or vegetables. This recipe, however, takes a creative twist by incorporating Mexican-inspired flavors, blending two beloved culinary traditions into one delicious dish.
Stuffed pasta dishes have been a staple in Italian households for centuries, with recipes like cannelloni and manicotti being popular choices. The idea of stuffing pasta likely emerged as a way to make meals more filling and flavorful, using simple, accessible ingredients.
On the other hand, tacos have a rich history in Mexican cuisine, dating back to indigenous cultures. The combination of seasoned meat, cheese, and spices has been a favorite for generations. By merging these two traditions, this recipe offers a unique fusion that celebrates the best of both worlds.
Over time, fusion cuisine has gained popularity, with chefs and home cooks experimenting with new flavor combinations. This recipe is a perfect example of how blending culinary traditions can result in something truly special and delicious.
Ingredient Deep Dive
Jumbo Pasta Shells
Jumbo pasta shells are the star of this dish, providing the perfect vessel for the taco filling. Originating from Italian cuisine, these shells are designed to hold hearty fillings, making them ideal for baked dishes. When selecting pasta shells, look for ones that are sturdy and uniform in size to ensure even cooking.
Nutritionally, pasta shells are a good source of carbohydrates, providing energy for your day. They also contain small amounts of protein and fiber. To store, keep them in a cool, dry place in an airtight container. If you’re looking for a gluten-free option, many brands offer gluten-free jumbo shells made from rice or corn flour.
Ground Beef
Ground beef is a classic ingredient in taco recipes, offering a rich, savory flavor. It’s a versatile protein that pairs well with spices and cheese. When choosing ground beef, opt for a leaner cut (85/15 or 90/10) to reduce excess grease in the filling.
From a nutritional standpoint, ground beef is high in protein and essential nutrients like iron and zinc. It’s also a good source of B vitamins, which support energy metabolism. Store ground beef in the refrigerator for up to two days or freeze it for longer storage. For a healthier twist, you can substitute ground turkey or plant-based meat.
Taco Seasoning
Taco seasoning is the flavor powerhouse of this dish, combining spices like chili powder, cumin, garlic powder, and paprika. You can use store-bought seasoning or make your own blend for a fresher taste. Homemade seasoning allows you to control the salt and spice levels to suit your preferences.
Nutritionally, taco seasoning is low in calories but packed with flavor. Many of the spices used have antioxidant and anti-inflammatory properties. Store your seasoning in an airtight container in a cool, dark place to maintain its potency. If you’re watching your sodium intake, look for low-sodium options or adjust your homemade blend accordingly.
Cheese
Cheese adds a creamy, melty element to this dish, making it irresistible. Cheddar and Monterey Jack are popular choices for their excellent melting properties and bold flavors. You can also experiment with other cheeses like pepper jack for a spicy kick or mozzarella for a milder taste.
Cheese is a good source of calcium and protein, but it’s also high in fat and calories, so moderation is key. Store cheese in the refrigerator, wrapped tightly to prevent it from drying out. For a dairy-free version, consider using plant-based cheese alternatives made from nuts or soy.
Common Mistakes to Avoid
- Overcooking the pasta shells: This can make them too soft and difficult to stuff. Cook them al dente for the best texture.
- Using too much filling: Overstuffing the shells can cause them to burst during baking. Aim for a heaping tablespoon per shell.
- Skipping the seasoning: Don’t skimp on the taco seasoning—it’s what gives the dish its signature flavor.
- Not draining the beef: Excess grease can make the filling too oily. Drain the beef well after cooking.
- Using cold cheese: Let the cheese come to room temperature before baking for even melting.
- Overbaking: Keep an eye on the dish to prevent the cheese from burning. Bake until bubbly and golden.
- Forgetting to grease the baking dish: This can cause the shells to stick. Lightly grease the dish before assembling.
- Not letting it rest: Allow the dish to cool for a few minutes before serving to let the flavors meld.
Essential Techniques
Boiling Pasta Shells
Boiling pasta shells to the perfect texture is crucial for this recipe. Cook them al dente, which means they should be tender but still firm to the bite. This ensures they hold their shape when stuffed and baked. Always salt the boiling water generously to enhance the pasta’s flavor.
Seasoning the Filling
The taco seasoning is what gives the filling its bold, savory flavor. Be sure to mix it thoroughly with the cooked ground beef to ensure every bite is packed with flavor. If you’re using store-bought seasoning, taste the filling and adjust the seasoning if needed.
Stuffing the Shells
Stuffing the shells can be a bit tricky, but it’s worth the effort. Use a spoon or piping bag to fill each shell evenly. Don’t overstuff them, as this can cause them to burst during baking. A heaping tablespoon of filling per shell is usually perfect.
Baking to Perfection
Baking is the final step that brings everything together. Bake the stuffed shells until the cheese is melted and bubbly, and the edges of the pasta are slightly crispy. Keep an eye on the dish to prevent overbaking, which can dry out the filling.
Pro Tips for Perfect Cheesy Taco Stuffed Pasta Shells
- Use a piping bag or ziplock bag with the corner cut off to make stuffing the shells easier and less messy.
- Add a splash of pasta water to the baking dish before baking to keep the shells moist.
- For extra flavor, mix a bit of salsa or diced tomatoes into the filling.
- Top the dish with fresh cilantro or green onions for a pop of color and freshness.
- Let the dish rest for 5-10 minutes after baking to allow the flavors to meld and make it easier to serve.
- If you’re short on time, prepare the filling and stuff the shells ahead of time, then bake when ready.
- For a spicier version, add diced jalapeños or a dash of hot sauce to the filling.
- Serve with a side of sour cream, guacamole, or extra salsa for dipping.
Variations and Adaptations
Regional Variations
This recipe can be adapted to reflect different regional flavors. For a Tex-Mex twist, add black beans and corn to the filling. For a Mediterranean version, use ground lamb, feta cheese, and oregano instead of taco seasoning.
Seasonal Adaptations
In the summer, try adding fresh diced tomatoes and corn to the filling for a lighter, seasonal twist. In the winter, incorporate roasted vegetables like butternut squash or sweet potatoes for a heartier dish.
Dietary Modifications
For a gluten-free version, use gluten-free pasta shells. For a vegetarian option, substitute the ground beef with plant-based meat or a mixture of beans and lentils. For a low-carb version, try using zucchini boats instead of pasta shells.
Flavor Variations
Experiment with different cheeses like pepper jack, queso fresco, or smoked gouda for unique flavor profiles. You can also add a layer of enchilada sauce or salsa verde for extra depth.
Texture Modifications
For a creamier filling, mix in a bit of cream cheese or sour cream. For a crunchier topping, sprinkle crushed tortilla chips or breadcrumbs over the cheese before baking.
Presentation Alternatives
Instead of baking in a traditional dish, try using individual ramekins for a more elegant presentation. You can also layer the stuffed shells in a casserole dish with additional sauce and cheese for a lasagna-style dish.
Serving and Presentation Guide
When serving Cheesy Taco Stuffed Pasta Shells, presentation is key. Arrange the shells neatly in the baking dish, ensuring they’re evenly spaced. Top with a generous layer of cheese for that golden, bubbly finish. Garnish with fresh cilantro, diced tomatoes, or sliced green onions for a pop of color.
For a more formal presentation, serve the shells on individual plates with a side of guacamole, sour cream, or salsa. You can also add a small salad or roasted vegetables on the side for a complete meal. If you’re serving at a party, consider setting up a toppings bar with various garnishes and sauces so guests can customize their plates.
Temperature is also important. Serve the dish hot, straight from the oven, to ensure the cheese is perfectly melted and the filling is warm. If you’re preparing it ahead of time, reheat it in the oven rather than the microwave to maintain the texture and flavor.
Portion control is another consideration. While it’s tempting to load up on these delicious shells, a serving of 2-3 shells per person is usually sufficient, especially if you’re serving sides. For larger appetites, you can increase the portion size accordingly.
Finally, don’t forget the drinks! Pair this dish with a refreshing beverage like iced tea, lemonade, or a light beer. For a more festive occasion, consider serving margaritas or sangria to complement the Mexican-inspired flavors.
Wine and Beverage Pairing
When it comes to pairing beverages with Cheesy Taco Stuffed Pasta Shells, you have plenty of options. For wine lovers, a light red like Pinot Noir or a crisp white like Sauvignon Blanc works well. The acidity in these wines helps cut through the richness of the cheese and beef.
If you prefer beer, a light lager or a Mexican-style cerveza like Corona or Modelo is a great choice. The refreshing quality of these beers complements the bold flavors of the dish without overpowering them.
For non-alcoholic options, consider serving iced tea, lemonade, or a sparkling water with a splash of lime. These beverages provide a refreshing contrast to the savory, cheesy flavors of the dish.
If you’re serving this dish at a party, consider offering a variety of drink options to suit different preferences. A self-serve drink station with wine, beer, and non-alcoholic options is a great way to keep everyone happy.
Finally, don’t forget about coffee or tea for dessert. A cup of strong coffee or a soothing herbal tea can be the perfect way to end the meal, especially if you’re serving a rich dessert like flan or churros.
Storage and Shelf Life
Leftover Cheesy Taco Stuffed Pasta Shells can be stored in an airtight container in the refrigerator for up to 3 days. To reheat, place the shells in a baking dish, cover with foil, and bake at 350°F until heated through. You can also reheat individual portions in the microwave, though the oven method will preserve the texture better.
For longer storage, you can freeze the stuffed shells before baking. Assemble the dish as directed, then wrap it tightly in plastic wrap and foil. Freeze for up to 2 months. When ready to bake, thaw overnight in the refrigerator and bake as directed, adding a few extra minutes if needed.
If you’ve already baked the dish, you can still freeze the leftovers. Allow the shells to cool completely, then transfer them to a freezer-safe container. Reheat in the oven for best results.
Signs of spoilage include an off smell, mold, or a slimy texture. If you notice any of these, discard the dish immediately. Always use your best judgment when consuming leftovers.
To maintain the best quality, avoid freezing the dish more than once. If you’re planning to freeze, consider dividing the recipe into smaller portions for easier reheating.
Make Ahead Strategies
One of the best things about this recipe is that it can be prepared ahead of time. You can cook the pasta shells and prepare the filling up to 2 days in advance. Store the cooked shells and filling separately in the refrigerator until you’re ready to assemble and bake.
If you’re planning to serve the dish at a party or gathering, consider assembling it the night before. Cover the baking dish tightly with plastic wrap and refrigerate. When ready to bake, remove the plastic wrap, cover with foil, and bake as directed, adding a few extra minutes if needed.
For meal prep, you can portion the stuffed shells into individual containers and refrigerate or freeze them. This makes it easy to grab a quick, homemade meal on busy days. Simply reheat in the oven or microwave when ready to eat.
If you’re short on time, you can also use pre-cooked ground beef or store-bought taco seasoning to speed up the process. These shortcuts can save you valuable time without sacrificing flavor.
Finally, consider preparing extra filling and freezing it for future use. This way, you can quickly assemble a batch of stuffed shells whenever the craving strikes.
Scaling Instructions
This recipe is easy to scale up or down depending on your needs. To halve the recipe, simply reduce all ingredients by half and use a smaller baking dish. Keep an eye on the baking time, as it may be slightly shorter with fewer shells.
To double or triple the recipe, increase the ingredients accordingly and use a larger baking dish or multiple dishes. You may need to adjust the baking time slightly, so check the dish periodically to ensure it’s cooking evenly.
When scaling up, consider the capacity of your oven and baking dishes. If you’re making a large batch, you may need to bake the shells in multiple batches or use multiple racks in the oven. Rotate the dishes halfway through baking to ensure even cooking.
Storage considerations are also important when scaling up. If you’re making a large batch for a party, plan ahead for how you’ll store any leftovers. Have plenty of airtight containers on hand, and consider freezing portions for future meals.
Finally, keep in mind that scaling up may require additional prep time. Allow yourself extra time to cook the pasta, prepare the filling, and assemble the shells, especially if you’re making a large quantity.
Nutritional Deep Dive
This dish offers a balanced mix of macronutrients, making it a satisfying and nutritious meal. The ground beef provides a good source of protein, essential for muscle repair and growth. The pasta shells contribute carbohydrates, which are the body’s primary energy source.
Cheese adds calcium and fat, which are important for bone health and energy. However, it’s also high in calories, so moderation is key. You can reduce the fat content by using lean ground beef and low-fat cheese if desired.
Micronutrients in this dish include iron from the beef, which supports oxygen transport in the blood, and B vitamins, which are important for energy metabolism. The taco seasoning also contains spices like cumin and paprika, which have antioxidant properties.
For those watching their calorie intake, portion control is important. A serving of 2-3 shells is typically sufficient, especially if paired with a side salad or vegetables. You can also reduce the calorie content by using less cheese or opting for a lower-calorie filling.
Overall, this dish can be part of a balanced diet when enjoyed in moderation. Pair it with plenty of vegetables and whole grains for a well-rounded meal.
Dietary Adaptations
Gluten-Free
To make this recipe gluten-free, use gluten-free jumbo pasta shells. Be sure to check the labels on your taco seasoning and other ingredients to ensure they’re gluten-free as well.
Dairy-Free
For a dairy-free version, substitute the cheese with a plant-based alternative. Many brands offer dairy-free cheese that melts well and has a similar flavor profile.
Vegan
To make this dish vegan, use plant-based ground meat and dairy-free cheese. You can also add extra vegetables like bell peppers, zucchini, or mushrooms to the filling for added flavor and nutrition.
Low-Carb
For a low-carb option, skip the pasta shells and use zucchini boats instead. Simply hollow out zucchini halves, stuff them with the taco filling, and bake as directed.
Keto
To make this recipe keto-friendly, use low-carb pasta shells or zucchini boats. Be mindful of the carb content in the taco seasoning and adjust as needed.
Paleo
For a paleo version, use zucchini boats and ensure all ingredients, including the taco seasoning, are paleo-compliant. Avoid dairy and processed ingredients.
Low-FODMAP
To make this dish low-FODMAP, use gluten-free pasta shells and ensure the taco seasoning is free from high-FODMAP ingredients like garlic and onion. You can also use a low-FODMAP cheese like cheddar.
Troubleshooting Guide
Texture Issues
If the pasta shells are too soft, you may have overcooked them. Next time, cook them al dente and avoid overstuffing. If the filling is too dry, add a splash of salsa or broth to moisten it.
Flavor Balance
If the dish tastes bland, you may need to adjust the seasoning. Taste the filling before stuffing the shells and add more taco seasoning or salt as needed. You can also add a bit of lime juice for brightness.
Temperature Problems
If the cheese isn’t melting evenly, ensure it’s at room temperature before baking. If the dish is browning too quickly, cover it with foil to prevent burning.
Equipment Challenges
If you don’t have a piping bag, use a ziplock bag with the corner cut off to stuff the shells. If your baking dish is too small, divide the shells between two dishes to ensure even cooking.
Ingredient Substitutions
If you’re out of ground beef, you can use ground turkey, chicken, or plant-based meat. If you don’t have jumbo pasta shells, try using manicotti or cannelloni tubes instead.
Timing Concerns
If you’re short on time, prepare the filling and cook the pasta ahead of time. Assemble the dish just before baking to save time.
Recipe Success Stories
Many home cooks have shared their success stories with this recipe, praising its simplicity and delicious flavor. One reader mentioned that it’s now a family favorite, with her kids asking for it every week. Another cook shared that she made it for a potluck and received countless compliments.
Some readers have also experimented with variations, adding their own twists to the recipe. One person added black beans and corn to the filling for extra texture, while another used a mix of cheeses for a more complex flavor. These adaptations show just how versatile this recipe can be.
Photography tips have also been a popular topic among readers. Many have shared that garnishing the dish with fresh herbs and colorful toppings makes it look even more appetizing. Some have even used individual ramekins for a more elegant presentation.
Overall, this recipe has been a hit with both novice and experienced cooks. Its ease of preparation and crowd-pleasing flavors make it a go-to dish for any occasion.
Frequently Asked Questions
Can I use a different type of pasta?
Yes, you can use manicotti or cannelloni tubes if you don’t have jumbo pasta shells. Just adjust the stuffing technique accordingly.
Can I make this dish ahead of time?
Absolutely! You can prepare the filling and cook the pasta up to 2 days in advance. Assemble and bake when ready to serve.
Can I freeze this dish?
Yes, you can freeze the stuffed shells before or after baking. Thaw in the refrigerator and reheat in the oven for best results.
What can I serve with this dish?
This dish pairs well with a side salad, roasted vegetables, or garlic bread. You can also serve it with guacamole, sour cream, or salsa for dipping.
Can I use a different type of meat?
Yes, ground turkey, chicken, or plant-based meat are all great alternatives to ground beef.
How do I prevent the shells from sticking to the baking dish?
Lightly grease the baking dish before assembling the shells to prevent sticking.
Can I make this dish vegetarian?
Yes, simply substitute the ground beef with plant-based meat or a mixture of beans and lentils.
How do I know when the dish is done baking?
The dish is done when the cheese is melted and bubbly, and the edges of the pasta are slightly crispy.
Can I use store-bought taco seasoning?
Yes, store-bought seasoning works well, but you can also make your own blend for a fresher taste.
What’s the best way to reheat leftovers?
Reheat in the oven at 350°F until warmed through. Avoid microwaving, as it can make the pasta soggy.
Additional Resources
If you enjoyed this recipe, you might also like our Easy Chicken Enchilada Casserole or Spicy Beef Stuffed Peppers. Both dishes are packed with flavor and perfect for busy weeknights.
For more tips on cooking with pasta, check out our guide to Perfecting Pasta: Tips and Techniques. You’ll learn how to cook pasta to the perfect texture and pair it with delicious sauces.
If you’re interested in exploring more fusion recipes, our Italian-Mexican Fusion Favorites collection is a must-read. From lasagna tacos to pizza quesadillas, these recipes are sure to inspire your next meal.
Finally, don’t forget to check out our Kitchen Essentials Guide for recommendations on the best tools and equipment for making dishes like this one. From baking dishes to piping bags, we’ve got you covered.
Join the Conversation
We’d love to hear how your Cheesy Taco Stuffed Pasta Shells turned out! Share your photos, tips, and variations on social media using the hashtag #TacoStuffedShells. Don’t forget to tag us so we can see your creations!
If you have any questions or need advice, feel free to leave a comment below. Our community of home cooks is always happy to help and share their experiences.
For more recipe inspiration, follow us on Instagram, Facebook, and Pinterest. We post new recipes, cooking tips, and behind-the-scenes content regularly. Join our community and become part of the conversation!
Finally, if you loved this recipe, consider leaving a review. Your feedback helps us improve and create more delicious recipes for you to enjoy. Happy cooking!
The Recipe
Cheesy Taco Stuffed Pasta Shells
Serves: 6
Prep Time: 20 mins
Cook Time: 30 mins
Total Time: 50 mins
Kitchen Equipment Needed
- Large pot
- Baking dish (9×13 inches)
- Skillet
- Mixing bowls
- Spoon or piping bag
Ingredients
- 12 jumbo pasta shells
- 1 lb ground beef
- 1 packet taco seasoning
- 1 cup shredded cheddar cheese
- 1 cup shredded Monterey Jack cheese
- 1/2 cup salsa
- 1/4 cup chopped cilantro (optional)
- 1/4 cup diced tomatoes (optional)
Directions
- Preheat the oven to 375°F (190°C).
- Cook the pasta shells according to package instructions until al dente. Drain and set aside.
- In a skillet, cook the ground beef over medium heat until browned. Drain excess grease.
- Add the taco seasoning and salsa to the beef, stirring to combine. Cook for 2-3 minutes, then remove from heat.
- In a mixing bowl, combine the cheddar and Monterey Jack cheeses.
- Stuff each pasta shell with the beef mixture and place them in the baking dish.
- Sprinkle the remaining cheese over the stuffed shells.
- Bake for 20-25 minutes, or until the cheese is melted and bubbly.
- Garnish with cilantro and diced tomatoes, if desired, before serving.
Recipe Notes
- For a spicier version, add diced jalapeños or a dash of hot sauce to the filling.
- You can use ground turkey or plant-based meat as a substitute for ground beef.
- Leftovers can be stored in the refrigerator for up to 3 days or frozen for up to 2 months.