Learn How to Make Cannoli: A Classic Italian Dessert with a Crispy Twist
Cannoli are a beloved Italian dessert that combines a crispy, golden shell with a creamy, sweet filling. Originating from Sicily, these delightful pastries are perfect for any occasion, from family gatherings to holiday celebrations. The contrast between the crunchy shell and the smooth ricotta filling is simply irresistible. Whether you’re a seasoned baker or a beginner, this easy cannoli recipe will guide you through the process of creating this classic treat at home.
The secret to perfect cannoli lies in the balance of textures and flavors. The shells are made from a simple dough that is rolled thin, shaped into tubes, and fried to golden perfection. The filling, traditionally made with ricotta cheese, is sweetened with sugar and often enhanced with vanilla, chocolate chips, or citrus zest. Each bite offers a symphony of flavors and textures that will transport you straight to Italy.
Quick Recipe Highlights
- Flavor Profile: Sweet, creamy, and slightly tangy with a hint of vanilla and chocolate.
- Texture: Crispy, flaky shell with a smooth and creamy filling.
- Aroma: Rich, buttery, and slightly sweet with a hint of citrus.
- Visual Appeal: Golden-brown shells dusted with powdered sugar, filled with creamy ricotta and chocolate chips.
- Skill Level Needed: Intermediate, with some experience in dough handling and frying.
- Special Equipment: Cannoli tubes, rolling pin, and a deep fryer or heavy-bottomed pot.
Recipe Overview
- Difficulty Level: This recipe is intermediate due to the need for precise dough rolling and frying techniques. However, with careful attention, even beginners can achieve great results.
- Category: Dessert
- Cuisine: Italian, specifically Sicilian.
- Cost: Moderate, with most ingredients being pantry staples.
- Season: Perfect for any season, but especially popular during holidays and celebrations.
- Occasion: Ideal for parties, family gatherings, or as a special treat.
Why You’ll Love This Recipe
Cannoli are a dessert that everyone loves, and making them at home allows you to enjoy the freshest, most flavorful version possible. The crispy shells and creamy filling are a match made in heaven, and the process of making them is both fun and rewarding. Plus, the aroma of freshly fried cannoli shells filling your kitchen is simply irresistible.
This recipe is also incredibly versatile. You can customize the filling with different flavors, such as adding citrus zest, cocoa powder, or even liqueurs. The shells can be made ahead of time and stored, making them a convenient option for entertaining. Plus, the presentation of cannoli is always impressive, making them a show-stopping dessert for any occasion.
Nutritionally, cannoli can be enjoyed in moderation as part of a balanced diet. The ricotta filling provides a good source of protein and calcium, while the shells offer a satisfying crunch. By making them at home, you can control the amount of sugar and choose high-quality ingredients.
Socially, cannoli are a crowd-pleaser. They are perfect for sharing and are sure to be a hit at any gathering. The process of making them can also be a fun activity to do with friends or family, creating lasting memories along with delicious treats.
Cost-wise, making cannoli at home is more economical than buying them from a bakery. The ingredients are relatively inexpensive, and you can make a large batch to enjoy or share. Plus, the satisfaction of creating such a classic dessert from scratch is priceless.
Historical Background and Cultural Significance
Cannoli have a rich history that dates back to Sicily, where they were originally made as a treat during Carnevale, the festive period before Lent. The name “cannoli” means “little tubes” in Italian, referring to the shape of the pastry. Traditionally, the shells were made by rolling dough around cane stalks, which is where the name originates.
Over time, cannoli became a symbol of Sicilian cuisine and culture. They are often associated with celebrations and special occasions, such as weddings and holidays. The dessert’s popularity spread beyond Sicily, and today, cannoli are enjoyed worldwide, with each region adding its own unique twist to the recipe.
The evolution of cannoli has seen many variations, from the classic ricotta filling to modern interpretations with different flavors and ingredients. Despite these changes, the essence of cannoli remains the same: a delightful combination of crispy shells and creamy filling that continues to captivate dessert lovers everywhere.
Ingredient Deep Dive
Ricotta Cheese
Ricotta cheese is the star of the cannoli filling. This fresh cheese is made from whey, a byproduct of cheese production, and has a mild, slightly sweet flavor. It is rich in protein and calcium, making it a nutritious addition to the dessert. When selecting ricotta, opt for whole milk ricotta for the creamiest texture. Store it in the refrigerator and use it within a few days of opening for the best flavor.
Cannoli Shells
The shells are made from a simple dough of flour, sugar, butter, and wine. The wine adds flavor and helps create a tender, flaky texture. The dough is rolled thin, cut into circles, and wrapped around cannoli tubes before frying. The result is a crispy, golden shell that perfectly complements the creamy filling. Store the shells in an airtight container to maintain their crispiness.
Chocolate Chips
Chocolate chips are a classic addition to the cannoli filling, adding a touch of sweetness and a delightful texture. You can use semi-sweet, dark, or milk chocolate chips, depending on your preference. For a more intense chocolate flavor, consider chopping a high-quality chocolate bar instead of using chips. Store chocolate in a cool, dry place to prevent melting.
Common Mistakes to Avoid
- Overworking the dough: This can make the shells tough. Handle the dough gently and avoid over-kneading.
- Rolling the dough too thick: Thin dough is essential for crispy shells. Aim for about 1/8 inch thickness.
- Frying at the wrong temperature: Too hot, and the shells will burn; too cool, and they will be greasy. Maintain an oil temperature of 350°F (175°C).
- Overfilling the cannoli: This can cause the shells to become soggy. Fill the cannoli just before serving.
- Using low-quality ricotta: The filling’s flavor depends on the quality of the ricotta. Choose a high-quality, fresh ricotta for the best results.
- Not draining the ricotta: Excess moisture can make the filling runny. Drain the ricotta in a fine-mesh sieve for at least an hour before using.
- Skipping the resting time: Allowing the dough to rest ensures it rolls out smoothly and fries evenly. Don’t skip this step.
- Using the wrong oil: Use a neutral oil with a high smoke point, such as vegetable or canola oil, for frying.
Essential Techniques
Rolling the Dough
Rolling the dough thin is crucial for achieving crispy cannoli shells. Use a rolling pin to roll the dough to about 1/8 inch thickness. If the dough springs back, let it rest for a few minutes before continuing. Use a circular cutter to cut the dough into even circles.
Frying the Shells
Frying the shells requires careful temperature control. Heat the oil to 350°F (175°C) and maintain this temperature throughout the frying process. Fry the shells until they are golden brown, turning them occasionally for even cooking. Remove them from the oil and drain on paper towels to remove excess oil.
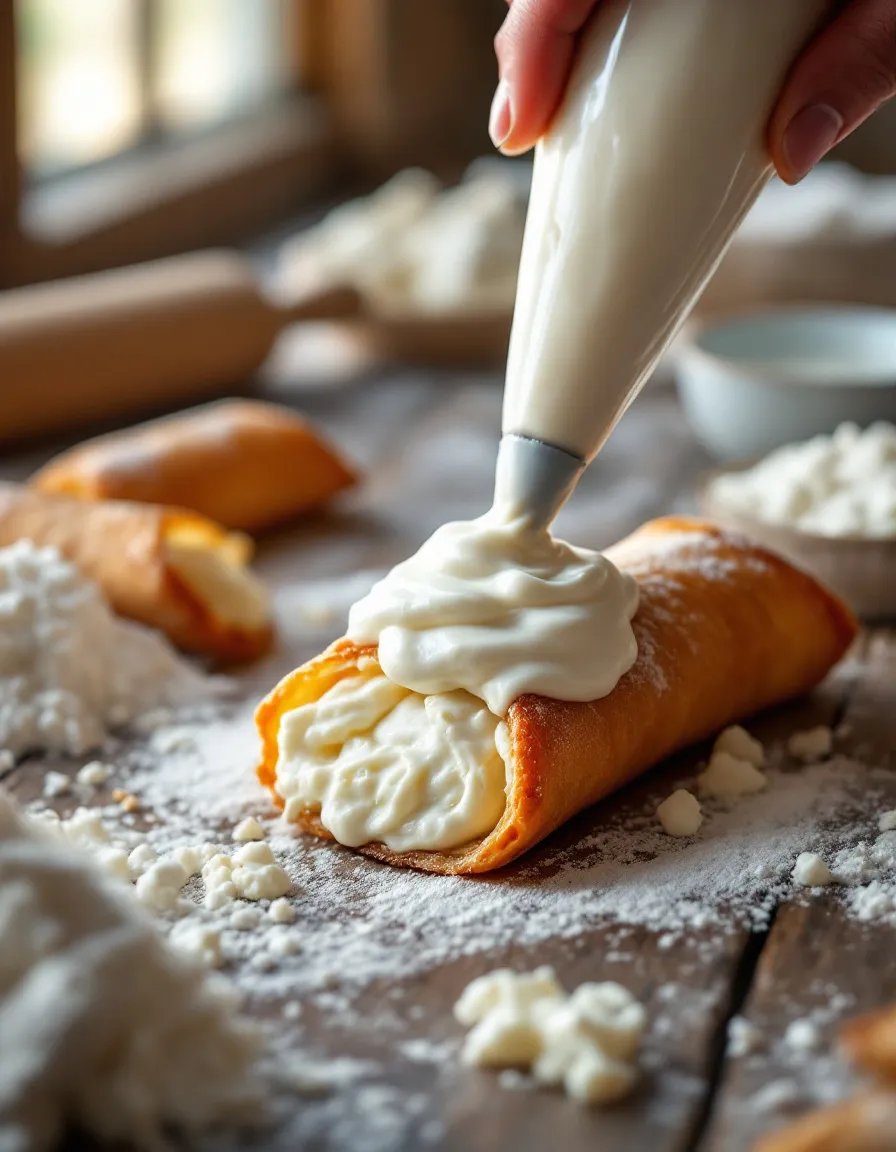
Filling the Cannoli
Fill the cannoli just before serving to maintain the shells’ crispiness. Use a piping bag or a small spoon to fill the shells with the ricotta mixture. Be careful not to overfill, as this can cause the shells to become soggy. Dust the filled cannoli with powdered sugar for a finishing touch.
Pro Tips for Perfect Cannoli
- Use a high-quality ricotta for the best flavor and texture.
- Roll the dough as thin as possible for crispy shells.
- Maintain the oil temperature at 350°F (175°C) for even frying.
- Drain the ricotta well to prevent a runny filling.
- Fill the cannoli just before serving to keep the shells crisp.
- Dust with powdered sugar for a classic finish.
- Experiment with different fillings, such as adding citrus zest or cocoa powder.
- Store unfilled shells in an airtight container to maintain crispiness.
Variations and Adaptations
Regional Variations
In different regions of Italy, cannoli fillings may vary. Some versions include candied fruit, pistachios, or even a chocolate ricotta filling. Experiment with these variations to discover new flavors.
Seasonal Adaptations
For a festive twist, add seasonal flavors to the filling. In the fall, consider adding pumpkin puree and spices. In the spring, fresh berries or citrus zest can brighten the flavor.
Dietary Modifications
For a gluten-free version, use a gluten-free flour blend for the shells. For a dairy-free option, substitute the ricotta with a dairy-free alternative, such as almond or coconut-based ricotta.
Flavor Variations
Add different flavors to the filling, such as cocoa powder, espresso, or liqueurs like amaretto or marsala wine. These additions can create unique and delicious variations of the classic cannoli.
Texture Modifications
For a different texture, consider adding chopped nuts or dried fruit to the filling. These additions can provide a delightful contrast to the creamy ricotta.
Presentation Alternatives
Instead of traditional cannoli tubes, try using smaller or larger molds for mini or giant cannoli. You can also experiment with different shapes, such as squares or triangles, for a modern twist.
Serving and Presentation Guide
Cannoli are best served fresh, with the shells filled just before serving to maintain their crispiness. Arrange them on a platter and dust with powdered sugar for a classic presentation. For a more elegant touch, drizzle with melted chocolate or sprinkle with chopped pistachios.
Traditional accompaniments include a cup of espresso or a glass of sweet dessert wine, such as Marsala. For a modern twist, serve with a scoop of gelato or a fruit compote.
Temperature considerations are important for the best texture. Serve cannoli at room temperature, as the filling can become too firm if chilled. If you must store filled cannoli, do so in the refrigerator and bring them to room temperature before serving.
Portion control is easy with cannoli, as they are naturally portioned into individual servings. However, their irresistible flavor may tempt you to have more than one!
Wine and Beverage Pairing
Cannoli pair beautifully with a variety of beverages. A sweet dessert wine, such as Marsala or Moscato, complements the creamy filling and crispy shell. For a non-alcoholic option, consider a rich hot chocolate or a cup of espresso.
Coffee and tea are also excellent pairings. The bitterness of espresso balances the sweetness of the cannoli, while a fragrant herbal tea can provide a refreshing contrast.
Temperature considerations are important when pairing beverages. Serve wine and coffee at their recommended temperatures to enhance the flavors of both the drink and the dessert.
Storage and Shelf Life
Unfilled cannoli shells can be stored in an airtight container at room temperature for up to a week. For longer storage, freeze the shells in a single layer and thaw at room temperature before filling.
The ricotta filling should be stored in the refrigerator and used within a few days. Fill the cannoli just before serving to maintain the shells’ crispiness.
Signs of spoilage include a sour smell or off taste in the filling, or shells that have become soft or stale. Always use fresh ingredients and store properly to ensure the best quality.
Reheating is not recommended for cannoli, as the shells will lose their crispiness. Instead, enjoy them fresh for the best texture and flavor.
Freezing filled cannoli is not recommended, as the filling can become watery upon thawing. However, you can freeze the shells and fill them after thawing.
Make Ahead Strategies
Cannoli shells can be made ahead of time and stored in an airtight container. This allows you to prepare the shells in advance and fill them just before serving.
The ricotta filling can also be prepared ahead of time and stored in the refrigerator. Drain the ricotta well and mix in the other ingredients, then cover and refrigerate until ready to use.
When assembling, fill the cannoli just before serving to maintain the shells’ crispiness. This ensures the best texture and flavor for your dessert.
If you need to store filled cannoli, do so in the refrigerator and bring them to room temperature before serving. However, for the best experience, fill them as close to serving time as possible.
Scaling Instructions
To halve the recipe, simply divide all the ingredients by two. This is a great option if you’re making cannoli for a smaller group or want to try the recipe without making a large batch.
For doubling or tripling the recipe, multiply the ingredients accordingly. Be sure to have enough cannoli tubes and frying space to accommodate the larger batch.
Equipment adjustments may be necessary when scaling the recipe. For example, you may need a larger pot for frying or additional baking sheets for cooling the shells.
Timing modifications may also be needed. Larger batches may require more time for rolling and frying, so plan accordingly to ensure everything is done at the same time.
Storage considerations are important when scaling. Ensure you have enough airtight containers to store the shells and filling, and plan for proper refrigeration if making the filling ahead of time.
Nutritional Deep Dive
Cannoli are a rich dessert, with each serving providing a balance of carbohydrates, fats, and proteins. The ricotta filling is a good source of calcium and protein, while the shells provide energy from carbohydrates.
The macronutrient breakdown includes a moderate amount of sugar from the filling and powdered sugar, as well as fats from the ricotta and frying oil. The protein content comes primarily from the ricotta cheese.
Micronutrients in cannoli include calcium from the ricotta, as well as small amounts of iron and vitamin A. The chocolate chips add a touch of antioxidants.
Health benefits of cannoli include the protein and calcium from the ricotta, which support bone health. However, due to the sugar and fat content, cannoli should be enjoyed in moderation as part of a balanced diet.
Dietary considerations include the high sugar and fat content, which may not be suitable for those with certain health conditions. However, with mindful portion control, cannoli can be enjoyed as an occasional treat.
Portion analysis is important for weight management. One cannoli is typically a satisfying portion, but it’s easy to indulge in more due to their delicious flavor. Be mindful of portion sizes to enjoy cannoli without overindulging.
Dietary Adaptations
Gluten-Free
For a gluten-free version, use a gluten-free flour blend for the shells. Ensure all other ingredients, such as the ricotta and chocolate chips, are also gluten-free.
Dairy-Free
Substitute the ricotta with a dairy-free alternative, such as almond or coconut-based ricotta. Use dairy-free chocolate chips and ensure all other ingredients are dairy-free.
Vegan
For a vegan version, use a dairy-free ricotta substitute and vegan chocolate chips. Replace the butter in the dough with a plant-based alternative, such as coconut oil.
Low-Carb
For a low-carb option, use a low-carb flour blend for the shells and a sugar substitute in the filling. Be mindful of the chocolate chips, as they can add carbs.
Keto
For a keto-friendly version, use almond flour for the shells and a keto-approved sweetener in the filling. Choose sugar-free chocolate chips to keep the carb count low.
Paleo
For a paleo version, use almond or coconut flour for the shells and a natural sweetener, such as honey or maple syrup, in the filling. Ensure all ingredients are paleo-approved.
Low-FODMAP
For a low-FODMAP version, use lactose-free ricotta and ensure all other ingredients are low-FODMAP. Be cautious with the chocolate chips, as some may contain high-FODMAP ingredients.
Troubleshooting Guide
Texture Issues
If the shells are too tough, you may have overworked the dough. Handle the dough gently and avoid over-kneading. If the shells are too soft, ensure the oil temperature is correct and fry until golden brown.
Flavor Balance
If the filling is too sweet, reduce the amount of sugar or balance it with a touch of citrus zest. If the filling is too bland, add more vanilla or a pinch of salt to enhance the flavors.
Temperature Problems
If the oil is too hot, the shells will burn; if too cool, they will be greasy. Use a thermometer to maintain the oil at 350°F (175°C) for even frying.
Equipment Challenges
If you don’t have cannoli tubes, you can use metal or wooden dowels of a similar size. Ensure they are smooth and clean to prevent the dough from sticking.
Ingredient Substitutions
If you can’t find ricotta, you can substitute with mascarpone or a blend of cream cheese and whipped cream. Adjust the sweetness and flavorings accordingly.
Timing Concerns
If the dough is difficult to roll, let it rest for a few minutes to relax the gluten. If the filling is too runny, drain the ricotta longer or add a thickener, such as powdered sugar or cornstarch.
Recipe Success Stories
Many home bakers have found success with this cannoli recipe, sharing their experiences and variations. Some have added unique flavors, such as espresso or orange zest, while others have experimented with different fillings, like chocolate or pistachio.
Community feedback has been overwhelmingly positive, with many praising the crispy shells and creamy filling. Some have even shared tips for making the process easier, such as using a pasta machine to roll the dough.
Adaptation stories include gluten-free and vegan versions, proving that cannoli can be enjoyed by everyone. These adaptations have inspired others to try the recipe and make it their own.
Reader suggestions have included serving cannoli with a side of fresh fruit or a drizzle of chocolate sauce. These ideas have added new dimensions to the classic dessert.
Photography tips have also been shared, with many recommending natural light and a simple backdrop to highlight the cannoli’s beauty. These tips have helped others capture stunning images of their creations.
Frequently Asked Questions
Can I make cannoli shells ahead of time?
Yes, you can make the shells ahead of time and store them in an airtight container. Fill them just before serving to maintain their crispiness.
Can I freeze cannoli?
You can freeze unfilled cannoli shells, but it’s not recommended to freeze filled cannoli as the filling can become watery upon thawing.
What can I use if I don’t have cannoli tubes?
You can use metal or wooden dowels of a similar size. Ensure they are smooth and clean to prevent the dough from sticking.
How do I prevent the shells from becoming soggy?
Fill the cannoli just before serving and avoid overfilling. Store unfilled shells in an airtight container to maintain their crispiness.
Can I use a different cheese for the filling?
Ricotta is traditional, but you can substitute with mascarpone or a blend of cream cheese and whipped cream. Adjust the sweetness and flavorings accordingly.
How do I know when the oil is the right temperature?
Use a thermometer to maintain the oil at 350°F (175°C). If the oil is too hot, the shells will burn; if too cool, they will be greasy.
Can I make gluten-free cannoli?
Yes, use a gluten-free flour blend for the shells and ensure all other ingredients are gluten-free.
How long do cannoli last?
Unfilled shells can last up to a week in an airtight container. Filled cannoli should be eaten within a day for the best texture.
Can I add different flavors to the filling?
Yes, you can add flavors like citrus zest, cocoa powder, or liqueurs to customize the filling to your taste.
What is the best way to serve cannoli?
Serve cannoli at room temperature, dusted with powdered sugar. Pair with espresso or dessert wine for a classic Italian experience.
Additional Resources
For more Italian dessert recipes, check out our guides on tiramisu, panna cotta, and gelato. These recipes are perfect for expanding your dessert repertoire and impressing your guests.
Technique guides on dough rolling and frying can help you master the skills needed for perfect cannoli. Practice makes perfect, and these guides will set you on the right path.
Ingredient information on ricotta, chocolate, and wine can help you choose the best quality ingredients for your cannoli. High-quality ingredients make a significant difference in the final result.
Equipment recommendations for cannoli tubes, rolling pins, and frying thermometers can ensure you have the right tools for the job. Investing in good equipment can make the process easier and more enjoyable.
Seasonal variations on cannoli can inspire you to try new flavors and presentations. From holiday-themed fillings to summer fruit additions, there’s always a new way to enjoy this classic dessert.
Join the Conversation
We love hearing from our readers! Share your cannoli creations on social media and tag us for a chance to be featured. Your photos and stories inspire others to try the recipe and make it their own.
Photography tips from our community can help you capture the beauty of your cannoli. Natural light, simple backdrops, and creative plating can make your photos stand out.
Recipe reviews and feedback are invaluable to us. Let us know how your cannoli turned out and any tips or variations you discovered along the way.
Community engagement is at the heart of what we do. Join our online forums to connect with other bakers, share your experiences, and learn from each other.
Recipe variations and adaptations are always welcome. Whether you’ve created a gluten-free version or added a unique twist, we’d love to hear about it. Your creativity inspires us all.
The Recipe
Cannoli
Serves: 12 cannoli
Prep Time: 30 mins
Cook Time: 20 mins
Total Time: 50 mins
Kitchen Equipment Needed
- Cannoli tubes
- Rolling pin
- Deep fryer or heavy-bottomed pot
- Piping bag or small spoon
- Circular cutter
Ingredients
- 2 cups all-purpose flour
- 2 tablespoons granulated sugar
- 1/4 teaspoon salt
- 2 tablespoons unsalted butter, cold and cubed
- 1/2 cup dry white wine
- 1 egg white, lightly beaten
- Vegetable oil, for frying
- 2 cups ricotta cheese, drained
- 1/2 cup powdered sugar
- 1 teaspoon vanilla extract
- 1/2 cup mini chocolate chips
- Powdered sugar, for dusting
Directions
- In a large bowl, whisk together the flour, sugar, and salt. Cut in the butter until the mixture resembles coarse crumbs.
- Gradually add the wine, mixing until the dough comes together. Knead lightly until smooth, then wrap in plastic and let rest for 30 minutes.
- Roll the dough out to 1/8 inch thickness. Cut into 4-inch circles using a circular cutter.
- Wrap each circle around a cannoli tube, sealing the edges with egg white.
- Heat the oil to 350°F (175°C). Fry the shells until golden brown, about 2-3 minutes per side. Remove and drain on paper towels. Let cool slightly before removing the tubes.
- In a medium bowl, mix the ricotta, powdered sugar, and vanilla until smooth. Fold in the chocolate chips.
- Fill a piping bag with the ricotta mixture and pipe into the cooled shells. Dust with powdered sugar before serving.
Recipe Notes
- For a richer filling, use whole milk ricotta.
- If you don’t have cannoli tubes, you can use metal or wooden dowels of a similar size.
- Store unfilled shells in an airtight container for up to a week. Fill just before serving.