Delicious Hawaiian Pineapple Cake Bars: A Tropical Delight
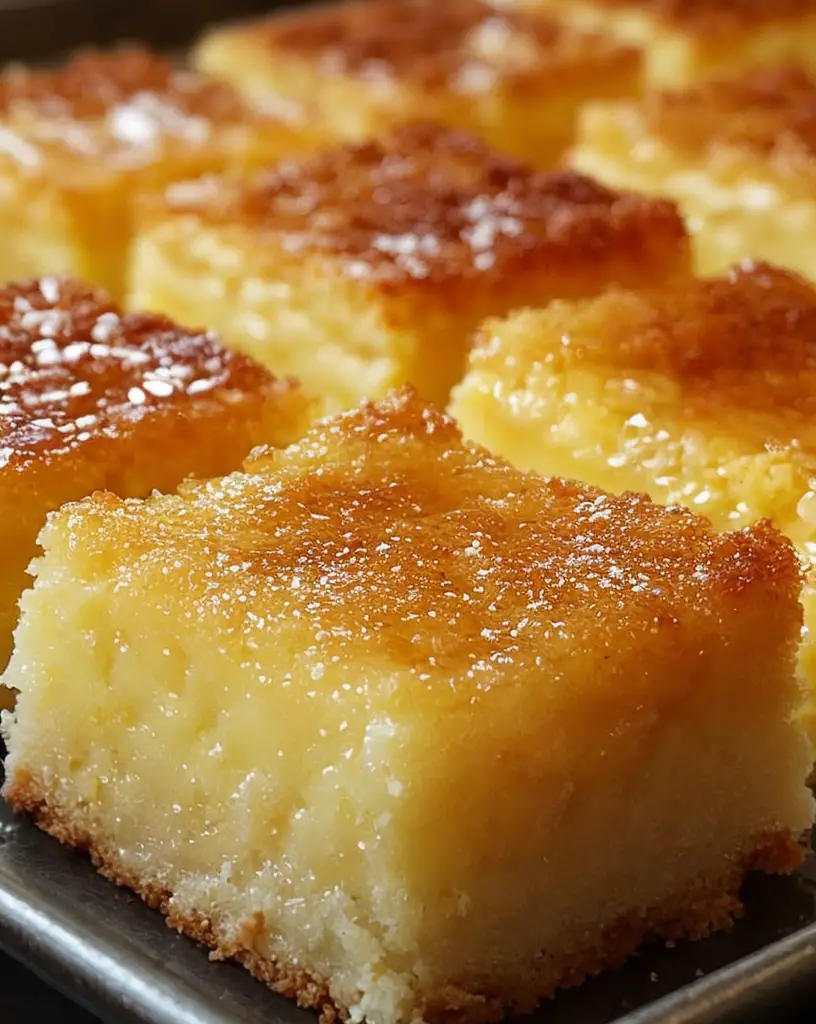
Imagine the taste of a tropical vacation in your mouth with these Hawaiian Pineapple Cake Bars. This sweet treat merges the tartness of pineapple with a buttery cake base, capturing the essence of island flavors in every bite. Perfect for parties, casual get-togethers, or a simple after-meal dessert, these bars are easy to make and loved by all. The golden pineapple topping not only adds a pop of color but also infuses each piece with juicy bursts of freshness that bring paradise a little closer to home.
Quick Recipe Highlights
- Flavor Profile: A perfect balance of tangy pineapple and buttery cake sweetness.
- Texture: Soft and moist with a slightly crumbly cake base and juicy pineapple topping.
- Aroma: Inviting hints of tropical pineapple blended with buttery cake notes.
- Visual Appeal: Vibrant, golden yellow topping on a solid base makes for an eye-catching dessert.
- Skill Level Needed: Perfect for beginners with simple, straightforward steps.
- Special Equipment: Basic baking tools like a mixing bowl, spatula, and baking pan.
Recipe Overview
- Difficulty Level: This recipe is rated as easy due to its minimal steps and use of readily available ingredients. Perfect for amateur bakers.
- Category: These cake bars fall under desserts, particularly ideal for quick sweet fixes.
- Cuisine: Inspired by Hawaiian flavors, these bars bring an exotic twist to typical cake bar recipes with their use of tropical fruits.
- Cost: Economical, using pantry staples with the addition of reasonably priced canned or fresh pineapple.
- Season: Best enjoyed year-round, especially in summer when tropical cravings hit.
- Occasion: Great for picnics, potlucks, or even a simple family dessert night.
Why You’ll Love This Recipe
The Hawaiian Pineapple Cake Bars are a textural delight, combining a soft and moist base with a juicy and slightly crunchy topping. Each bite provides a wave of tropical flavor thanks to the pineapple, which is perfectly balanced with the buttery richness of the cake. Not only is the recipe simple and quick, making it perfect for those who wish to bake but are short on time, but it’s also light on the pocket, utilizing accessible and affordable ingredients.
These pineapple cake bars are not only delicious, but their bright colors and tropical flavors make them ideal for sharing at gatherings and parties. They offer a fantastic opportunity to enjoy a taste of Hawaii at home. Moreover, the nutritional content of pineapples provides vitamin C and dietary fibers, making these more than just a sweet indulgence. Whether you’re hosting a barbecue or just craving something sweet and unique, these bars are an excellent choice.
Historical Background and Cultural Significance
Pineapples, a symbol of hospitality and welcome, have been integral to Hawaiian culture and cuisine. Originally brought to Hawaii by early European explorers, the tropical fruit thrived in the island’s climate and became a key agricultural product. The evolution of pineapple in recipes reflects its journey from a rare luxury to an everyday pantry staple available worldwide.
Traditionally, Hawaiian desserts make good use of the pineapple’s natural sweetness and acidity, often pairing it with simple cake recipes to let the fruit shine. Though the exact origin of pineapple cake bars is hard to pin down, they reflect the innovation of home cooks who sought to bring a touch of exotic flavor into everyday treats. Over time, variations incorporating additional tropical fruits and flavorings like coconut have emerged, showing the recipe’s adaptability across regions.
Ingredient Deep Dive
Pineapple is the star ingredient in this recipe, renowned for its vibrant flavor and juicy texture. It is native to South America and became a crucial crop in Hawaii due to James Dole’s efforts in the early 1900s. Pineapple is also an excellent source of vitamin C and manganese, and when selecting the fruit, look for one that has a sweet aroma and feels firm but slightly yielding to the touch. Store pineapples at room temperature to enhance their flavor, or refrigerate them for longer storage.
Flour, as the structural backbone of the cake base, plays a crucial role in determining the bars’ texture and consistency. All-purpose flour is favored due to its versatility and balance of strength and tenderness. Store flour in a cool, dry place, ideally in an airtight container to prevent any absorption of odors or moisture. If you’re looking for gluten-free options, rice flour and almond flour are good alternatives, though they may alter the final texture slightly.
Common Mistakes to Avoid
- Over-mixing the batter can lead to a dense, tough cake. Stir just until the ingredients are combined.
- Using too much baking soda can result in an unpleasant chemical taste, so measure carefully.
- Skipping the line of the baking pan with parchment can cause sticking, making it hard to remove the bars cleanly.
- Choosing underripe pineapple may result in a less flavorful dessert. Look for ripe, sweet-smelling fruits.
- Overbaking can dry out the bars, so keep an eye on the timer and perform the toothpick test.
- Not allowing the bars to cool properly in the pan can make them crumble when cut.
- Failing to drain canned pineapple will introduce excess liquid into the batter, leading to soggy bars.
- Using low-quality butter or margarine can affect the flavor and texture of your cake base.
Essential Techniques
Whisking the dry ingredients thoroughly ensures even distribution of leavening agents, preventing uneven rise and texture in the cake bars. A gentle folding technique when mixing the wet and dry ingredients preserves air and ensures a light, fluffy batter. Visual cues include checking for a light golden top and using a toothpick inserted into the center, which should come out clean.
Pro Tips for Perfect Hawaiian Pineapple Cake Bars
For a deeper flavor, consider caramelizing the pineapple with a little brown sugar before adding it to the batter. Allowing the bars to rest for at least 10 minutes once baked will intensify the flavors and make cutting easier. If you want an extra tropical touch, sprinkle shredded coconut over the pineapple topping. Use fresh pineapple when possible for the most refreshing taste, but if canned is the only option, ensure it’s well-drained. Serve slightly warm for a classic comfort dessert or chilled for a refreshing summer snack. For a hint of zest, add some freshly grated ginger to the batter.
Variations and Adaptations
For a Caribbean twist, try adding rum-soaked raisins or using coconut milk instead of regular milk for added richness and flavor. If you’re aiming for a more health-conscious take, substitute some of the sugar with honey or a natural syrup. For those with dietary restrictions, almond flour can replace all-purpose flour for a gluten-free version, while coconut oil can be an effective vegan alternative to butter.
Serving and Presentation Guide
These cake bars are best showcased whole on a rustic wooden board or a simple white platter to enhance their vibrant colors. For an extra garnish, consider a dollop of whipped cream or a sprinkling of chopped nuts. This dessert pairs perfectly with vanilla ice cream or a dollop of whipped cream. Baking these in individual ramekins also adds a sophisticated touch to serving and makes portion control easier, ideal for lavish dinner parties.
Wine and Beverage Pairing
Pair your Hawaiian Pineapple Cake Bars with a late-harvest Riesling wine to complement the fruity sweetness. For a non-alcoholic option, a chilled mint lemonade or coconut water with a splash of lime will balance the cake’s sweetness beautifully. Light coffee, like a Costa Rican blend, can also enhance the dessert experience without overpowering the delicate flavors.
Storage and Shelf Life
Store leftover pineapple cake bars in an airtight container in the refrigerator for up to five days. If freezing, wrap each bar individually in foil or plastic wrap and place them in a freezer-safe container to avoid freezer burn. When ready to enjoy, thaw in the fridge overnight or warm slightly in the oven, avoiding the microwave, which can alter the texture.
Make Ahead Strategies
The batter can be prepared a day ahead and stored in the refrigerator, allowing you to bake fresh when needed. Ensure the pineapple topping is added just before baking to maintain its texture and prevent sogginess. If made ahead, warming the bars lightly before serving can refresh their aromatic and flavorful qualities.
Scaling Instructions
For larger gatherings, simply double the recipe and bake in a larger 9×13-inch pan, adjusting the cooking time as needed. If halving, an 8×8-inch pan is ideal. Monitor the baking process closely, as cooking times may vary based on the pan size, and adjust your cutting techniques accordingly for even portions.
Nutritional Deep Dive
These cake bars provide a modest source of energy with their harmonious blend of carbohydrates and sugars. Pineapple enhances dietary vitamin C intake, essential for immune function, while the cake base includes moderate fats and proteins. By maintaining portion control, these bars can be enjoyed responsibly as part of a balanced diet.
Dietary Adaptations
For a gluten-free version, swap all-purpose flour for a blend of rice flour and tapioca starch. A dairy-free adaptation can be easily achieved with almond milk and coconut oil as substitutes. For those on a low-carb or keto diet, use almond flour and erythritol to replace flour and sugar respectively without compromising flavor.
The Recipe
Hawaiian Pineapple Cake Bars
Serves: 12
Prep Time: 15 mins
Cook Time: 30 mins
Total Time: 45 mins
Kitchen Equipment Needed
- Medium mixing bowl
- Whisk
- Spatula
- 9×13-inch baking pan
- Parchment paper
Ingredients
- 2 cups all-purpose flour
- 1 cup granulated sugar
- 1/2 cup unsalted butter, melted
- 2 large eggs
- 1 tsp vanilla extract
- 1 tsp baking powder
- 1/2 tsp baking soda
- 1/2 tsp salt
- 1 can (20 oz) crushed pineapple, well-drained
Directions
- Preheat your oven to 350°F (175°C) and line a 9×13-inch baking pan with parchment paper.
- In a medium bowl, combine flour, sugar, baking powder, baking soda, and salt.
- In a separate bowl, whisk together melted butter, eggs, and vanilla extract until well combined.
- Add the wet ingredients to the dry and fold gently until just combined.
- Spread the batter evenly in the prepared baking pan.
- Evenly distribute the drained crushed pineapple over the top of the batter.
- Bake for approximately 30 minutes or until a toothpick inserted into the center comes out clean.
- Allow to cool in the pan then lift out using the parchment for easy cutting and serving.
Recipe Notes
- Use fresh pineapple for a more vibrant flavor, chopping it finely before distributing over the batter.
- Coconut flakes or a sprinkle of brown sugar can add a new dimension to the topping.
Troubleshooting Guide
If the cake bars turn out too dense, ensure the batter is not over-mixed and that fresh leavening agents are used. For lack of flavor, verify that ripe, sweet pineapples are utilized, and consider adding a splash of vanilla to enhance the overall taste. Too much moisture in the bars usually indicates excess pineapple juice; always ensure the fruit is well-drained.
Recipe Success Stories
Our readers have raved about the versatility and simplicity of these cake bars. Many found joy in adding extra fruits or nuts to make the recipe their own. One reader shared their success in using dried coconut as a topping to complement the tropical theme, while another recommended serving these bars at beach-themed parties for a coastal twist.
Frequently Asked Questions
Can fresh pineapple be used instead of canned?
Yes, fresh pineapple works wonderfully. Ensure it is finely chopped and drained of excess moisture to avoid soggy cake bars.
Is it possible to use a different fruit?
Certainly! Mangos or peaches would work well and provide a similar tropical flair.
Can these cake bars be frozen?
Yes, they can be frozen. Wrap them individually and store in airtight containers to maintain freshness.
How long do they keep?
Stored in the refrigerator, they stay fresh for about five days. For longer storage, freezing is recommended.
Is a substitute available for butter?
Coconut oil or margarine works as an alternative, though it may slightly affect the texture and flavor.
Can I make this recipe vegan?
Use a flax egg (1 tablespoon ground flaxseed mixed with 2.5 tablespoons water) and coconut oil in place of eggs and butter.
Why is parchment paper used?
Parchment prevents sticking and makes it easy to lift out the bars for cutting and serving.
Why is my topping uneven?
Ensure the pineapple is evenly distributed and gently pressed into the batter before baking.
Why does my cake taste flat?
Double-check the freshness of your ingredients, particularly baking powder and vanilla.
Can I double the recipe?
Yes, simply adjust baking time when using a larger pan to ensure even cooking.
Additional Resources
Explore more tropical-inspired baking recipes such as coconut macaroons or mango coconut tart for a flavorful journey. Check out guides on mastering the perfect cake texture to enhance your baking skills. Research on locally available substitute ingredients is useful if specific items are unavailable.
Join the Conversation
We invite you to share your Hawaiian Pineapple Cake Bar creations on social media using our dedicated hashtag. Engage with a community passionate about tropical desserts, swap tips, and try out different variations. Your feedback and creative spins on this recipe help enrich the culinary narrative.
In conclusion, these Hawaiian Pineapple Cake Bars are a sweet, flavorful innovation that truly embody the spirit of the tropics. Perfect for any baker, this simple yet delightful recipe will quickly become a favorite in your dessert repertoire.

