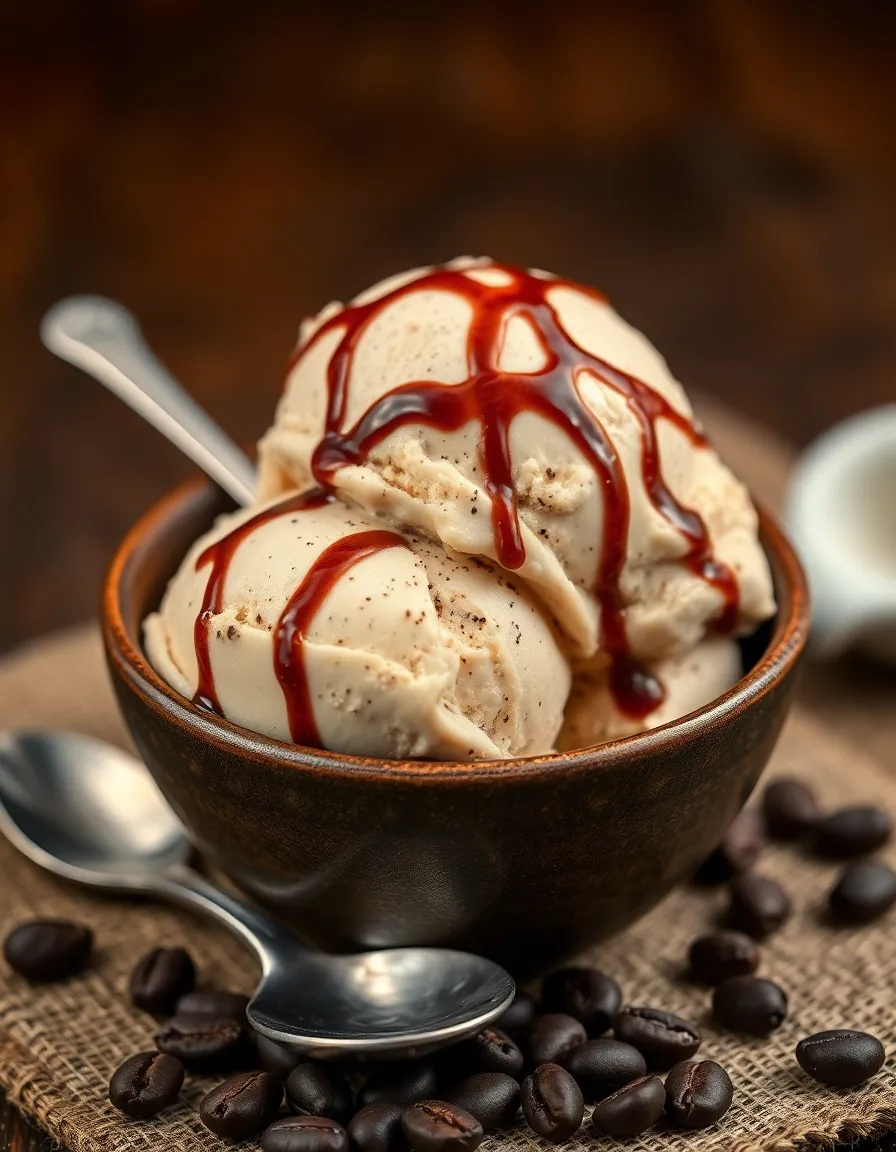
There’s something magical about the first spoonful of homemade coffee ice cream—rich, velvety, and with just the right kick of caffeine to make your taste buds dance. I remember the first time I tried making it at home, skeptical that it could ever rival the store-bought versions I adored. But one bite of that silky, deeply flavored scoop, and I was hooked. No more settling for overly sweet or artificial-tasting pints! This recipe delivers the smoothest, creamiest coffee ice cream, with a boldness that lingers in the best way possible. Whether you’re a coffee connoisseur or just someone who loves a good dessert, this one’s for you.
Ingredients You’ll Need
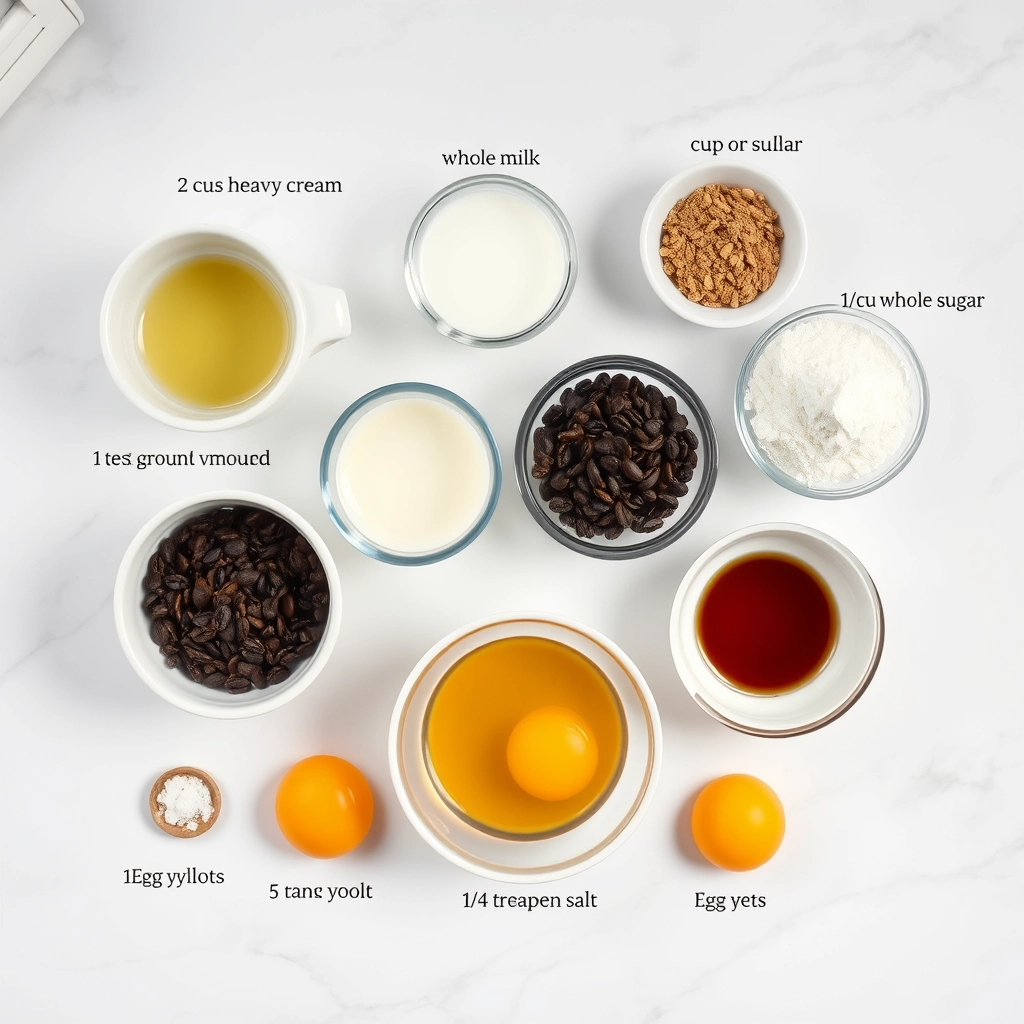
Gathering the right ingredients is key to achieving that perfect balance of creaminess and coffee intensity. Here’s what you’ll need:
- Heavy cream (2 cups): The backbone of any great ice cream, ensuring a luxuriously smooth texture.
- Whole milk (1 cup): Adds just enough lightness without sacrificing richness.
- Granulated sugar (3/4 cup): Sweetens the deal without overpowering the coffee flavor.
- Instant espresso powder (2 tablespoons): My secret weapon for deep, robust coffee flavor. If you don’t have espresso powder, finely ground coffee works too—just strain it out later.
- Egg yolks (4): Creates that dreamy custard base for extra creaminess.
- Vanilla extract (1 teaspoon): A subtle warmth that complements the coffee beautifully.
- Pinch of salt): Balances the sweetness and enhances all the flavors.
Step-by-Step Instructions
Now, let’s dive into making this dreamy coffee ice cream. Don’t worry—it’s easier than you think!
- Infuse the coffee flavor: In a saucepan, warm the milk, heavy cream, and espresso powder over medium heat until steaming (but not boiling). Stir until the espresso dissolves completely. Remove from heat and let it steep for 10 minutes to deepen the flavor.
- Prepare the custard base: In a separate bowl, whisk the egg yolks and sugar until pale and slightly thickened. Slowly pour the warm coffee-infused milk into the egg mixture, whisking constantly to avoid curdling.
- Cook the custard: Return the mixture to the saucepan and cook over low heat, stirring constantly with a wooden spoon, until it thickens enough to coat the back of the spoon (about 5–7 minutes). This step requires patience—don’t rush it!
- Strain and chill: Pour the custard through a fine-mesh sieve into a clean bowl to ensure silky smoothness. Stir in the vanilla and salt, then cover and refrigerate for at least 4 hours (or overnight) until completely chilled.
- Churn: Pour the chilled mixture into your ice cream maker and churn according to the manufacturer’s instructions, usually about 20–25 minutes, until it reaches a soft-serve consistency.
- Freeze to perfection: Transfer the ice cream to a lidded container and freeze for another 4 hours (or until firm). Pro tip: Press a piece of parchment paper directly onto the surface before sealing to prevent ice crystals.
And there you have it—homemade coffee ice cream that’s impossibly smooth, decadently creamy, and packed with real coffee flavor. But wait, there’s more! Let’s talk about how to make it your own…
There’s something magical about the rich, velvety texture of homemade coffee ice cream—especially when it’s as smooth and bold as this recipe promises. Whether you’re a coffee aficionado or just looking for a decadent treat, this dessert is sure to satisfy. Below, I’ve included some pro tips, serving suggestions, and answers to common questions to help you make the most of your coffee ice cream experience.
Pro Tips & Variations
Want to take your coffee ice cream to the next level? Try these expert-approved tweaks:
- Espresso Boost: For an extra caffeine kick, dissolve 1–2 teaspoons of instant espresso powder into the cream mixture before churning.
- Dairy-Free Option: Swap heavy cream and whole milk for full-fat coconut milk for a luscious vegan version.
- Flavor Twists: Stir in chocolate chips, crushed biscotti, or a swirl of caramel sauce for added texture and sweetness.
- Cold Brew Swap: If you prefer a smoother coffee taste, replace the brewed coffee with cold brew concentrate for a less acidic flavor.
What to Serve With Coffee Ice Cream
This creamy delight pairs beautifully with so many treats! Here are a few of my favorites:
- Warm brownies or chocolate lava cake for a classic affogato-inspired dessert.
- A drizzle of salted caramel or hot fudge sauce for extra indulgence.
- Crumbled amaretti cookies or toasted almonds for a delightful crunch.
- A simple scoop in a waffle cone for pure, nostalgic joy.
Storage & Reheating Tips
To keep your coffee ice cream at its best:
- Store in an airtight container with a piece of parchment paper pressed against the surface to prevent ice crystals.
- Consume within 2 weeks for optimal freshness (though let’s be honest—it probably won’t last that long!).
- If the ice cream hardens too much in the freezer, let it sit at room temperature for 5–10 minutes before scooping.
Frequently Asked Questions
Can I use decaf coffee?
Absolutely! This recipe works just as well with decaf, so you can enjoy it any time of day without the caffeine jitters.
Why is my ice cream icy instead of creamy?
This usually happens if the mixture isn’t churned enough or if the fat content is too low. Make sure to use full-fat dairy and churn until it reaches a soft-serve consistency before freezing.
Can I make this without an ice cream maker?
Yes! Pour the mixture into a shallow dish and freeze, stirring vigorously every 30 minutes for about 3–4 hours to break up ice crystals.
How can I make it sweeter?
Add an extra tablespoon of sugar or a splash of vanilla extract to balance the bitterness of the coffee.
Final Thoughts
There’s nothing quite like the comfort of homemade coffee ice cream—rich, creamy, and packed with the deep, roasted flavors we all love. Whether you enjoy it solo or dressed up with toppings, this recipe is a little jar of happiness waiting to be scooped. So grab your spoon, take a bite, and let every creamy mouthful remind you that sometimes, the simplest pleasures are the sweetest. Happy churning!
PrintHomemade Coffee Ice Cream Smooth, Creamy & Bold!
Description
A rich and creamy homemade coffee ice cream with a bold coffee flavor, perfect for coffee lovers.
Ingredients
For the Crust:
- 2 cups heavy cream
- 1 cup whole milk
- 3/4 cup granulated sugar
- 1/4 cup finely ground coffee beans
- 1 teaspoon vanilla extract
- 1/4 teaspoon salt
- 5 large egg yolks
Instructions
1. Prepare the Crust:
- In a medium saucepan, combine the heavy cream, milk, sugar, ground coffee, and salt. Heat over medium heat until steaming but not boiling, stirring occasionally.
- In a separate bowl, whisk the egg yolks until smooth. Slowly pour about 1 cup of the hot cream mixture into the yolks, whisking constantly to temper them.
- Pour the tempered yolk mixture back into the saucepan and cook over low heat, stirring constantly, until the mixture thickens enough to coat the back of a spoon (about 5-7 minutes).
- Strain the mixture through a fine-mesh sieve into a clean bowl to remove the coffee grounds. Stir in the vanilla extract.
- Cover and refrigerate the mixture for at least 4 hours or overnight until thoroughly chilled.
- Churn the mixture in an ice cream maker according to the manufacturer’s instructions. Transfer to a freezer-safe container and freeze for at least 2 hours before serving.
Notes
You can customize the seasonings to taste.