Irresistible Mini Crème Brûlée Cheesecakes: A Perfect Dessert for Any Occasion
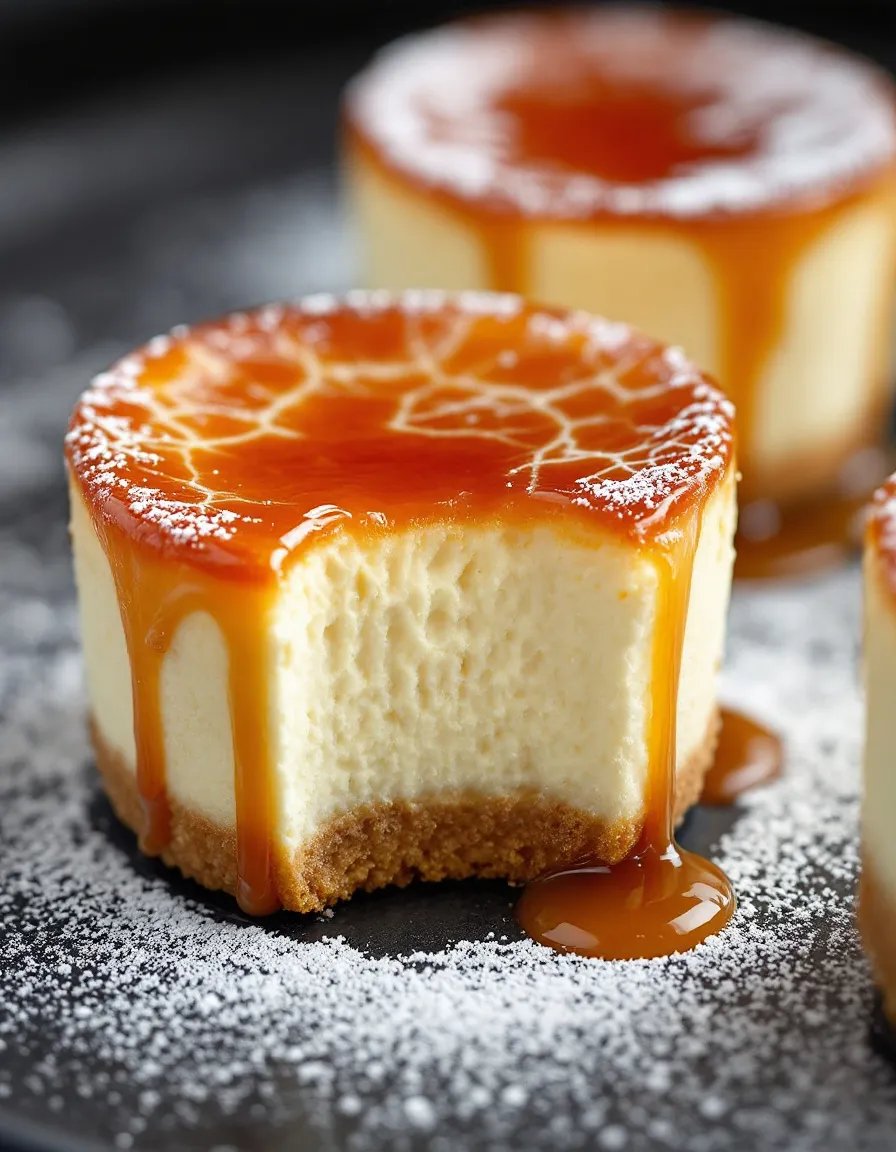
If you’re looking for a dessert that combines the creamy richness of cheesecake with the caramelized crunch of crème brûlée, these Irresistible Mini Crème Brûlée Cheesecakes are your answer. Perfect for dinner parties, holiday gatherings, or just a sweet treat for yourself, these mini cheesecakes are sure to impress. With a velvety smooth filling and a perfectly torched sugar topping, they offer a delightful contrast of textures and flavors that will leave your guests craving more.
What makes these mini cheesecakes truly special is their versatility. They can be prepared ahead of time, making them a stress-free option for entertaining. The combination of cream cheese, vanilla, and a hint of lemon zest creates a balanced flavor profile that is both indulgent and refreshing. Plus, the individual servings make them easy to serve and enjoy without the need for slicing or plating.
Quick Recipe Highlights
- Flavor Profile: A harmonious blend of creamy cheesecake with a caramelized sugar crust, enhanced by subtle hints of vanilla and lemon zest.
- Texture: Smooth and velvety filling with a satisfyingly crisp sugar topping that cracks with every bite.
- Aroma: The rich scent of baked cheesecake mingles with the sweet, toasty aroma of caramelized sugar.
- Visual Appeal: Golden, crackly tops with a creamy interior, served in elegant individual portions.
- Skill Level Needed: Intermediate, with a focus on precise baking and torching techniques.
- Special Equipment: A kitchen torch is essential for achieving the perfect caramelized topping.
Recipe Overview
- Difficulty Level: This recipe is ideal for bakers with some experience, as it requires attention to detail in both baking and torching.
- Category: Dessert, perfect for special occasions or indulgent treats.
- Cuisine: A fusion of French crème brûlée and American cheesecake traditions.
- Cost: Moderate, with most ingredients being pantry staples.
- Season: Suitable year-round, but especially delightful during the holiday season.
- Occasion: Great for dinner parties, holidays, or as a show-stopping dessert for any celebration.
Why You’ll Love This Recipe
These Mini Crème Brûlée Cheesecakes are a dream come true for dessert lovers. The creamy cheesecake filling is rich and decadent, while the caramelized sugar topping adds a delightful crunch. The combination of flavors and textures creates a dessert that is both sophisticated and comforting. Whether you’re hosting a dinner party or simply treating yourself, these mini cheesecakes are sure to impress.
One of the best things about this recipe is its convenience. The cheesecakes can be made ahead of time, allowing you to focus on other aspects of your meal preparation. The individual servings make them easy to serve and enjoy, and their elegant presentation adds a touch of sophistication to any occasion. Plus, the recipe is versatile, allowing you to customize the flavors to suit your preferences.
From a nutritional standpoint, these mini cheesecakes offer a balanced indulgence. While they are rich and creamy, the portion size helps keep calorie intake in check. The use of high-quality ingredients ensures that every bite is packed with flavor, making it a dessert worth savoring. Whether you’re a seasoned baker or a novice, this recipe is a great way to elevate your dessert game.
Socially, these mini cheesecakes are a hit. Their individual servings make them perfect for sharing, and their elegant presentation is sure to spark conversation. They are a great way to showcase your baking skills and impress your guests. Plus, the recipe is easy to scale, making it suitable for both small gatherings and large parties.
Cost-wise, this recipe is relatively affordable. Most of the ingredients are pantry staples, and the recipe yields a generous number of servings. The use of a kitchen torch, while essential, is a one-time investment that can be used for many other recipes. Overall, these mini cheesecakes offer a high-end dessert experience without breaking the bank.
Historical Background and Cultural Significance
The origins of crème brûlée can be traced back to 17th-century France, where it was known as “burnt cream.” The dessert gained popularity in England and Spain before becoming a staple in French cuisine. Its signature caramelized sugar topping was traditionally achieved using a hot iron, but modern techniques have made it more accessible with the use of kitchen torches.
Cheesecake, on the other hand, has ancient roots dating back to Greece, where it was served to athletes during the first Olympic Games. The recipe evolved over centuries, with the addition of cream cheese in the 19th century giving rise to the modern version we know today. The combination of these two iconic desserts creates a unique and indulgent treat that pays homage to their rich histories.
The fusion of crème brûlée and cheesecake is a relatively modern innovation, reflecting the global exchange of culinary traditions. This recipe brings together the best of both worlds, offering a dessert that is both classic and contemporary. Its popularity has grown in recent years, thanks to its elegant presentation and irresistible flavor profile.
Regional variations of this recipe abound, with some incorporating local flavors such as matcha, chocolate, or fruit compotes. The versatility of the recipe allows for endless creativity, making it a favorite among home bakers and professional chefs alike. Whether served at a high-end restaurant or a family gathering, these mini cheesecakes are sure to delight.
Ingredient Deep Dive
Cream Cheese: The star of the show, cream cheese provides the rich, creamy base for the cheesecake filling. Opt for full-fat cream cheese for the best texture and flavor. Store it in the refrigerator and bring it to room temperature before use to ensure a smooth batter.
Sugar: Granulated sugar is used both in the filling and for the caramelized topping. For the topping, superfine sugar is recommended as it melts more evenly. Store sugar in an airtight container to prevent clumping.
Eggs: Eggs act as a binding agent, giving the cheesecake its structure. Use fresh, room-temperature eggs for the best results. If you’re concerned about food safety, consider using pasteurized eggs.
Vanilla Extract: Pure vanilla extract enhances the flavor of the cheesecake, adding a warm, aromatic note. Avoid imitation vanilla for the best results. Store vanilla extract in a cool, dark place to preserve its flavor.
Lemon Zest: A hint of lemon zest adds a refreshing brightness to the cheesecake, balancing the richness of the cream cheese. Use organic lemons if possible, and zest them just before adding to the batter for maximum flavor.
Graham Cracker Crumbs: These form the base of the cheesecake, providing a crunchy contrast to the creamy filling. You can use store-bought crumbs or make your own by pulsing graham crackers in a food processor. Store crumbs in an airtight container to keep them fresh.
Common Mistakes to Avoid
- Overmixing the Batter: Overmixing can incorporate too much air, leading to cracks in the cheesecake. Mix just until the ingredients are combined.
- Baking at Too High a Temperature: High heat can cause the cheesecake to curdle or crack. Bake at a moderate temperature and use a water bath if necessary.
- Not Letting the Cheesecake Cool Gradually: Rapid cooling can cause the cheesecake to sink or crack. Let it cool in the oven with the door slightly open before transferring to the refrigerator.
- Using Cold Ingredients: Cold cream cheese and eggs can result in a lumpy batter. Always bring ingredients to room temperature before mixing.
- Skipping the Water Bath: A water bath helps regulate the temperature and prevents cracks. Don’t skip this step for the best results.
- Torching the Sugar Too Soon: Wait until the cheesecakes are fully chilled before torching the sugar to prevent melting.
- Uneven Sugar Layer: Apply the sugar in an even layer for consistent caramelization. Use a fine-mesh sieve for best results.
- Overbaking: Overbaking can dry out the cheesecake. The center should still be slightly jiggly when you remove it from the oven.
Essential Techniques
Creating a Smooth Batter: Start with room-temperature ingredients and mix gently to avoid incorporating too much air. Use a paddle attachment if using a stand mixer for the creamiest texture.
Using a Water Bath: A water bath helps maintain a consistent temperature, preventing cracks and ensuring even baking. Wrap the springform pan in foil to prevent water from seeping in.
Torching the Sugar: Hold the torch at a 45-degree angle and move it in a circular motion for even caramelization. Work quickly to avoid melting the cheesecake.
Cooling Gradually: Let the cheesecake cool in the oven with the door slightly open, then transfer to the refrigerator to set completely. This prevents sinking and cracking.
Pro Tips for Perfect Mini Crème Brûlée Cheesecakes
- Use a kitchen scale to measure ingredients for precision.
- Line the muffin tin with parchment paper for easy removal.
- Chill the cheesecakes thoroughly before torching to prevent melting.
- Experiment with different flavors, such as adding a layer of fruit compote or chocolate ganache.
- Serve with fresh berries or a drizzle of caramel sauce for added elegance.
- Use a fine-mesh sieve to dust the sugar evenly for a professional finish.
Variations and Adaptations
Regional Variations: Incorporate local flavors such as matcha, chocolate, or fruit compotes to create unique twists on the classic recipe.
Seasonal Adaptations: Add seasonal fruits like berries in the summer or spiced apples in the fall for a festive touch.
Dietary Modifications: Use gluten-free graham crackers for a gluten-free version, or substitute with a nut-based crust for a low-carb option.
Flavor Variations: Experiment with different extracts, such as almond or coconut, to create new flavor profiles.
Texture Modifications: Add a layer of crunchy nuts or a swirl of caramel for added texture.
Presentation Alternatives: Serve the cheesecakes in individual ramekins or on a platter with decorative garnishes for a stunning presentation.
Serving and Presentation Guide
Plating Techniques: Arrange the mini cheesecakes on a decorative platter, spacing them evenly for a polished look.
Garnishing Ideas: Top with fresh berries, mint leaves, or edible flowers for a pop of color and freshness.
Traditional Accompaniments: Serve with a side of whipped cream or a drizzle of caramel sauce for added indulgence.
Modern Serving Suggestions: Pair with a scoop of ice cream or a glass of dessert wine for a contemporary twist.
Temperature Considerations: Serve chilled for the best texture and flavor.
Portion Control Tips: The individual servings make portion control easy, but you can also cut larger cheesecakes into smaller pieces for a lighter option.
Wine and Beverage Pairing
Wine Pairings: A sweet dessert wine like Sauternes or a sparkling Moscato complements the richness of the cheesecake.
Non-Alcoholic Alternatives: Serve with a cup of herbal tea or a glass of sparkling water with a twist of lemon.
Coffee/Tea Pairings: A strong espresso or a cup of Earl Grey tea pairs beautifully with the creamy cheesecake.
Temperature Considerations: Serve beverages at the appropriate temperature to enhance the dining experience.
Serving Suggestions: Offer a selection of beverages to cater to different preferences and dietary needs.
Storage and Shelf Life
Storage Methods: Store the cheesecakes in an airtight container in the refrigerator for up to 5 days.
Temperature Requirements: Keep refrigerated at all times to maintain freshness and prevent spoilage.
Container Recommendations: Use a container with a tight-fitting lid to prevent odors from affecting the cheesecakes.
Signs of Spoilage: Discard if you notice any mold, off smells, or changes in texture.
Reheating Instructions: Not recommended, as the cheesecakes are best served chilled.
Freezing Guidelines: Freeze without the sugar topping for up to 2 months. Thaw in the refrigerator before torching and serving.
Make Ahead Strategies
Prep Timeline: Prepare the cheesecakes up to 2 days in advance and store them in the refrigerator. Torch the sugar topping just before serving.
Storage Between Steps: Keep the cheesecakes covered in the refrigerator to prevent drying out.
Quality Impact Assessment: The cheesecakes maintain their quality well when made ahead, with the texture improving as they chill.
Assembly Tips: Assemble the cheesecakes in the serving dish to minimize handling and preserve their appearance.
Reheating Guidelines: Not applicable, as the cheesecakes are best served chilled.
Fresh Element Additions: Add fresh garnishes just before serving to maintain their freshness and visual appeal.
Scaling Instructions
Halving the Recipe: Halve all ingredients and adjust baking time slightly, as smaller batches may bake faster.
Doubling or Tripling: Double or triple the ingredients and use multiple muffin tins. Monitor baking time closely, as larger batches may require adjustments.
Equipment Adjustments: Ensure you have enough muffin tins and oven space to accommodate larger batches.
Timing Modifications: Allow extra time for preparation and baking when scaling up the recipe.
Storage Considerations: Plan for adequate storage space in the refrigerator or freezer for larger batches.
Nutritional Deep Dive
Macro Breakdown: Each mini cheesecake contains a balance of fats, proteins, and carbohydrates, with the majority of calories coming from the cream cheese and sugar.
Micronutrient Analysis: The cheesecakes provide small amounts of calcium and vitamin A from the cream cheese and eggs.
Health Benefits: While indulgent, the portion-controlled servings help manage calorie intake, making them a balanced treat.
Dietary Considerations: The recipe can be adapted to suit various dietary needs, such as gluten-free or low-carb.
Portion Analysis: The individual servings make it easy to enjoy a controlled portion without overindulging.
Weight Management Tips: Pair with fresh fruit or a light salad to balance the meal and manage overall calorie intake.
Dietary Adaptations
Gluten-Free: Use gluten-free graham crackers or a nut-based crust to make the recipe gluten-free.
Dairy-Free: Substitute cream cheese with a dairy-free alternative and use a plant-based butter for the crust.
Vegan: Use vegan cream cheese, plant-based butter, and a flaxseed or chia egg substitute.
Low-Carb: Replace the graham cracker crust with a nut-based crust and use a low-carb sweetener.
Keto: Use almond flour for the crust and a keto-friendly sweetener for the filling and topping.
Paleo: Use a nut-based crust and natural sweeteners like honey or maple syrup.
Low-FODMAP: Use lactose-free cream cheese and a low-FODMAP sweetener.
Troubleshooting Guide
Texture Issues: If the cheesecake is too dense, ensure you’re not overmixing the batter. If it’s too runny, check that the eggs are fully incorporated.
Flavor Balance: Adjust the amount of sugar or lemon zest to suit your taste preferences.
Temperature Problems: Ensure the cheesecakes are fully chilled before torching to prevent melting.
Equipment Challenges: If you don’t have a kitchen torch, you can use the broiler, but watch closely to avoid burning.
Ingredient Substitutions: Experiment with different crusts or fillings to suit your dietary needs or flavor preferences.
Timing Concerns: Allow enough time for the cheesecakes to cool and set properly before serving.
Recipe Success Stories
Community Feedback: Many home bakers have shared their success stories, praising the recipe for its ease and impressive results.
Variation Successes: Readers have experimented with different flavors and presentations, creating unique twists on the classic recipe.
Adaptation Stories: Those with dietary restrictions have successfully adapted the recipe to suit their needs, proving its versatility.
Reader Suggestions: Suggestions for garnishes, accompaniments, and presentation ideas have enriched the recipe’s appeal.
Photography Tips: Readers have shared tips for capturing the perfect shot, highlighting the cheesecakes’ golden tops and creamy interiors.
Frequently Asked Questions
Q: Can I make these cheesecakes without a kitchen torch?
A: Yes, you can use the broiler, but watch closely to avoid burning the sugar.
Q: How do I prevent cracks in the cheesecake?
A: Avoid overmixing the batter, use a water bath, and let the cheesecakes cool gradually.
Q: Can I freeze these cheesecakes?
A: Yes, freeze without the sugar topping and thaw in the refrigerator before torching.
Q: What can I use instead of graham crackers for the crust?
A: You can use digestive biscuits, vanilla wafers, or a nut-based crust.
Q: How long do these cheesecakes last in the refrigerator?
A: They can be stored for up to 5 days in an airtight container.
Q: Can I make these cheesecakes ahead of time?
A: Yes, prepare them up to 2 days in advance and torch the sugar topping just before serving.
Q: What’s the best way to achieve an even sugar layer?
A: Use a fine-mesh sieve to dust the sugar evenly over the cheesecakes.
Q: Can I use a different type of sugar for the topping?
A: Superfine sugar works best, but you can also use granulated sugar in a pinch.
Q: How do I know when the cheesecakes are done baking?
A: The edges should be set, but the center should still be slightly jiggly.
Q: Can I add flavorings to the cheesecake batter?
A: Yes, experiment with extracts, citrus zest, or spices to customize the flavor.
Additional Resources
Related Recipes: Explore other dessert recipes like classic cheesecake, crème brûlée, or chocolate mousse for more indulgent treats.
Technique Guides: Learn more about baking techniques, such as using a water bath or torching sugar, to perfect your skills.
Ingredient Information: Discover the history and uses of key ingredients like cream cheese, vanilla, and graham crackers.
Equipment Recommendations: Find recommendations for essential baking tools, including kitchen torches, springform pans, and stand mixers.
Seasonal Variations: Get inspired with seasonal twists on the recipe, incorporating fresh fruits and spices for a festive touch.
Join the Conversation
Social Media Sharing: Share your creations on social media using the hashtag #MiniCremeBruleeCheesecakes and connect with other dessert enthusiasts.
Photography Tips: Capture the perfect shot by focusing on the golden sugar topping and creamy interior of the cheesecakes.
Recipe Reviews: Leave a review and share your experience with the recipe, including any variations or adaptations you tried.
Community Engagement: Join online baking communities to exchange tips, tricks, and inspiration for perfecting your desserts.
Recipe Variations: Share your unique twists on the recipe, from flavor additions to presentation ideas, and inspire others to get creative.
The Recipe
Irresistible Mini Crème Brûlée Cheesecakes
Serves: 12 mini cheesecakes
Prep Time: 20 mins
Cook Time: 30 mins
Total Time: 50 mins
Kitchen Equipment Needed
- Muffin tin
- Kitchen torch
- Mixing bowls
- Electric mixer
- Fine-mesh sieve
- Parchment paper
Ingredients
- 1 1/2 cups graham cracker crumbs
- 1/4 cup unsalted butter, melted
- 16 oz cream cheese, softened
- 1/2 cup granulated sugar
- 2 large eggs
- 1 tsp vanilla extract
- 1 tsp lemon zest
- 1/4 cup superfine sugar (for topping)
Directions
- Preheat the oven to 325°F (160°C). Line a muffin tin with parchment paper liners.
- In a bowl, mix graham cracker crumbs and melted butter. Press the mixture into the bottom of each liner to form the crust.
- In a large bowl, beat cream cheese and sugar until smooth. Add eggs one at a time, mixing well after each addition. Stir in vanilla extract and lemon zest.
- Divide the batter evenly among the prepared liners, filling each about 3/4 full.
- Bake for 20-25 minutes, or until the edges are set but the centers are still slightly jiggly. Let cool in the tin for 10 minutes, then transfer to a wire rack to cool completely.
- Chill the cheesecakes in the refrigerator for at least 2 hours.
- Before serving, sprinkle a thin, even layer of superfine sugar over each cheesecake. Use a kitchen torch to caramelize the sugar until golden and bubbly.
Recipe Notes
- For a gluten-free version, use gluten-free graham crackers or a nut-based crust.
- If you don’t have a kitchen torch, you can use the broiler, but watch closely to avoid burning.
- Store leftovers in an airtight container in the refrigerator for up to 5 days.