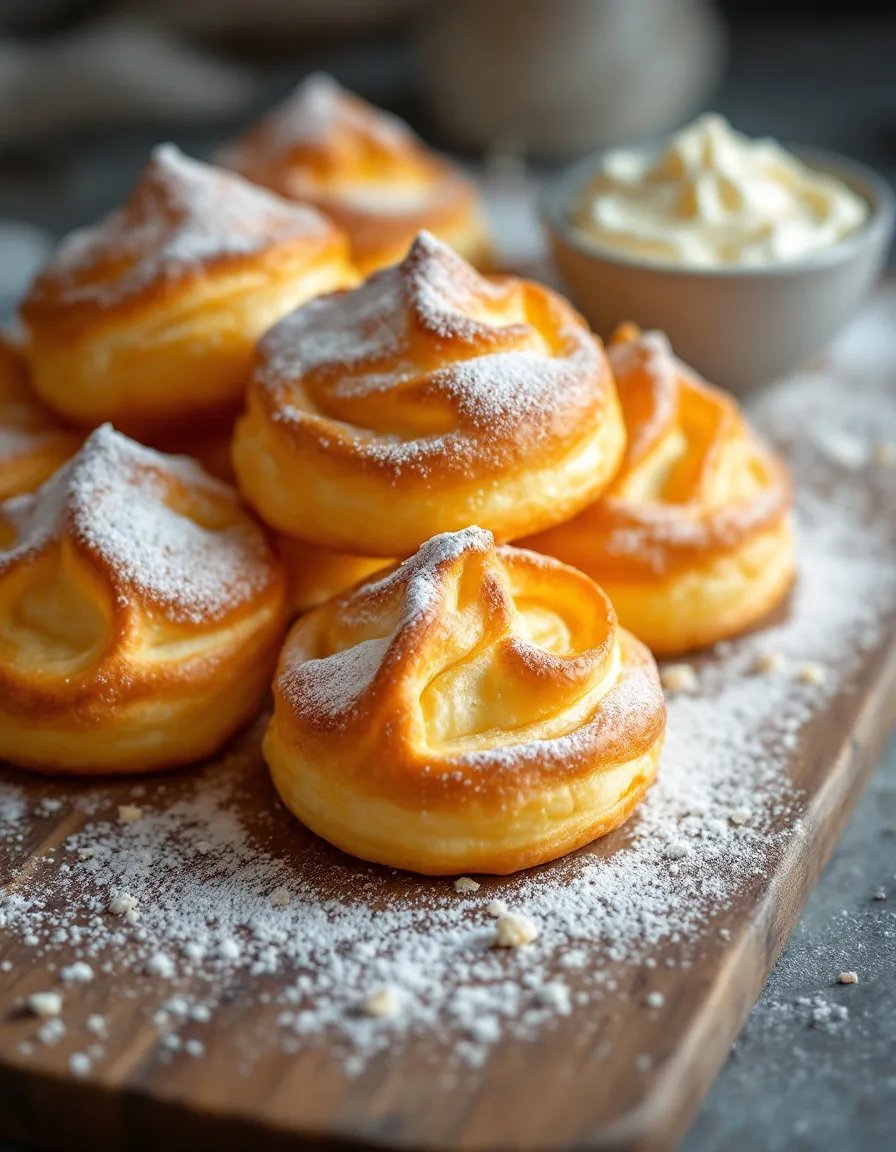
Nuns Puffs: Heavenly Light and Fluffy French Pastries
Nuns Puffs, or Pet de Nonne in French, are delicate, airy pastries that melt in your mouth with their light, buttery goodness. These heavenly treats have been enjoyed for centuries in French convents, where nuns perfected the art of creating these cloud-like confections. With a crisp golden exterior and an almost hollow interior, Nuns Puffs are the perfect balance of simplicity and elegance.
What makes these French pastries so special is their magical transformation in the oven. A simple choux pastry dough puffs up dramatically, creating beautiful golden domes with a delicate crispness that gives way to an airy, tender interior. The subtle sweetness and light texture make them perfect for breakfast, afternoon tea, or as an elegant dessert when dusted with powdered sugar.
Quick Recipe Highlights
- Flavor Profile: Delicate buttery sweetness with subtle vanilla notes that aren’t overpowering
- Texture: Crisp outer shell with an airy, almost hollow interior that melts in your mouth
- Aroma: Warm butter and vanilla with a comforting baked pastry fragrance
- Visual Appeal: Golden brown puffs with dramatic height and an elegant, simple presentation
- Skill Level Needed: Basic pastry skills required, including making choux dough and piping
- Special Equipment: Piping bag with large star tip, sturdy baking sheet, and a good mixer
Recipe Overview
- Difficulty Level: While not complicated, Nuns Puffs require attention to detail when making the choux pastry. The dough consistency and baking technique are crucial for proper puffing.
- Category: Perfect as breakfast pastries, tea-time treats, or light desserts. They straddle multiple categories beautifully.
- Cuisine: Deeply rooted in French convent baking traditions, these represent classic French pastry techniques.
- Cost: Very economical to make, using basic pantry ingredients like flour, butter, eggs, and sugar.
- Season: Wonderful year-round, but particularly comforting in cooler months with warm beverages.
- Occasion: Ideal for brunches, afternoon tea, or as an elegant yet simple dessert for dinner parties.
Why You’ll Love This Nuns Puffs Recipe
The magic of Nuns Puffs lies in their deceptive simplicity. With just a handful of basic ingredients, you can create pastries that look and taste like they came from a professional French bakery. The dramatic puffing in the oven never fails to impress, making these perfect when you want to serve something special without complicated techniques or exotic ingredients.
These light pastries offer wonderful versatility. Enjoy them plain for breakfast, dusted with powdered sugar for afternoon tea, or filled with pastry cream for an elegant dessert. Their neutral flavor profile makes them perfect canvases for both sweet and savory adaptations, allowing you to customize them for any occasion or personal preference.
From a practical standpoint, Nuns Puffs are relatively quick to make compared to many French pastries. The dough comes together in about 15 minutes, and while they do need to bake properly, the active cooking time is minimal. They’re also excellent make-ahead options – you can prepare the dough in advance or freeze baked puffs to refresh later.
Nutritionally, these are lighter than many pastries since they’re mostly air. While they do contain butter and eggs, the portion size is naturally controlled by their structure. Compared to denser pastries, you’ll find these surprisingly light and not overly rich, making them perfect when you want just a taste of something sweet.
For entertaining, Nuns Puffs offer tremendous visual impact with minimal effort. The dramatic height and golden color make them look far more impressive than their simple preparation would suggest. They’re perfect for when you want to serve something homemade that looks professionally made, without spending hours in the kitchen.
Historical Background and Cultural Significance
The origins of Nuns Puffs trace back to French convents in the Middle Ages, where nuns developed many of what we now consider classic French pastries. The name Pet de Nonne translates literally to “nun’s fart,” a humorous reference to the pastry’s light, airy nature. These delicate treats were traditionally made to use up leftover choux pastry, demonstrating the nuns’ resourcefulness and culinary creativity.
In convent kitchens, baking was both a practical skill and a spiritual practice. The careful preparation of these pastries was considered an act of devotion, with the resulting treats often given as gifts or sold to support the religious communities. The precision required to make perfect Nuns Puffs mirrored the discipline of convent life, while their ethereal lightness symbolized spiritual transcendence.
Over centuries, the recipe spread beyond convent walls, becoming a beloved part of French patisserie. While the humorous name might raise eyebrows today, it reflects the earthy humor common in medieval France. Regional variations emerged, with some areas adding citrus zest or different flavorings, but the basic technique remained unchanged – a testament to its perfection.
Today, Nuns Puffs represent an important link to France’s culinary heritage. While not as famous as éclairs or profiteroles (which use the same choux pastry base), they maintain a special place in French baking tradition. Many professional pastry chefs still learn to make them as part of their training, appreciating both their technical challenges and their elegant simplicity.
Ingredient Deep Dive
Butter
High-quality butter is essential for authentic Nuns Puffs. European-style butter with higher fat content (82-85%) produces the best results, contributing to both flavor and texture. The butter’s moisture helps create steam during baking, which is crucial for the dramatic puffing. Unsalted butter is preferred to control the salt level precisely. For optimal results, use butter at cool room temperature – too cold and it won’t incorporate properly, too warm and it may affect the dough structure.
Butter has been a cornerstone of French pastry since the Middle Ages, when Normandy became renowned for its dairy products. In Nuns Puffs, it provides richness without heaviness. For storage, keep butter tightly wrapped in the refrigerator, and bring it to the proper temperature before use. In a pinch, margarine can substitute, but the flavor and texture will differ noticeably.
Eggs
Fresh, room-temperature eggs are crucial for proper dough consistency. The proteins in eggs provide structure, while the fats contribute to richness and tenderness. As the eggs cook, they help set the pastry’s structure while allowing it to remain light. Older eggs actually work better than very fresh ones for choux pastry, as they’re slightly more alkaline, which helps with browning.
Eggs should be added one at a time, fully incorporated before adding the next. This gradual addition ensures proper emulsion and prevents the dough from becoming too loose. If you need to substitute, for each egg you can use 1/4 cup commercial egg substitute, though results may vary slightly. The eggs’ lecithin acts as an emulsifier, helping bind the fat and water in the dough.
Common Mistakes to Avoid
- Incorrect dough consistency: The dough should be smooth and glossy, holding its shape when piped. Too stiff and the puffs won’t expand properly; too loose and they’ll spread instead of puffing.
- Opening the oven too soon: The sudden temperature drop can cause the puffs to collapse. Resist peeking for at least the first 20 minutes of baking.
- Undercooking: Nuns Puffs need sufficient time to dry out inside. If removed too soon, they may deflate as they cool.
- Incorrect piping technique: Pipe straight down without swirling for the most even rise. Hold the bag about 1/2 inch above the baking sheet.
- Overcrowding the baking sheet: Leave at least 2 inches between puffs to allow for proper expansion and air circulation.
- Using cold eggs: Room temperature eggs incorporate more evenly into the dough, creating better texture.
- Inadequate flour cooking: The flour must be cooked thoroughly in the butter-water mixture to develop proper structure.
- Improper storage: Store cooled puffs in an airtight container at room temperature. Refrigeration can make them soggy.
Essential Techniques
Making Choux Pastry
The foundation of perfect Nuns Puffs lies in properly made choux pastry. Begin by bringing the water, butter, and salt to a full boil. Add the flour all at once and stir vigorously until the mixture forms a smooth ball that pulls away from the pan sides. This cooking step gelatinizes the starch in the flour, which helps the pastry puff while maintaining structure.
After transferring the dough to a mixing bowl, let it cool slightly before adding eggs. The eggs should be incorporated one at a time, beating well after each addition until the dough becomes smooth and glossy. Properly made choux dough should fall slowly from the spoon in a thick ribbon. This technique ensures the right balance of moisture and structure for optimal puffing.
Piping Technique
Proper piping is crucial for uniform Nuns Puffs. Use a large star tip (about 1/2 inch diameter) for traditional ridged appearance. Hold the piping bag perpendicular to the baking sheet, about 1/2 inch above the surface. Apply steady pressure while piping, then stop pressure before lifting the bag to avoid peaks. If peaks form, gently smooth them with a damp finger.
For consistent sizing, pipe mounds about 1 1/2 inches in diameter. Space them at least 2 inches apart to allow for expansion. If the dough sticks to the piping tip, dip it in water between piping. This technique ensures even baking and professional-looking results.
Pro Tips for Perfect Nuns Puffs
- For extra crispness, add a teaspoon of sugar to the dough. This promotes browning and adds subtle sweetness.
- Brush piped dough with beaten egg for enhanced browning and shine. Use a gentle hand to avoid deflating the shapes.
- Place a pan of water in the oven’s bottom rack during baking. The steam helps the puffs rise evenly.
- If puffs start browning too quickly, tent loosely with foil while they finish baking.
- For uniform size, use a cookie scoop to portion dough before piping for more control.
- Let puffs cool completely on a wire rack to prevent sogginess from trapped steam.
Variations and Adaptations
Flavor Variations
While classic Nuns Puffs are simply flavored with vanilla, you can easily customize them. Add citrus zest (lemon or orange work beautifully) to the dough for a bright note. For chocolate lovers, mix in 2 tablespoons cocoa powder with the flour, increasing sugar slightly. Spice variations like cinnamon, cardamom, or nutmeg add warmth – use about 1/2 teaspoon per batch.
Savory Adaptations
Reduce sugar to 1 teaspoon and add grated cheese (about 1/2 cup Gruyère or Parmesan) for delicious savory puffs. Herbs like chives, thyme, or rosemary work wonderfully in this version. Serve savory puffs as appetizers or alongside soups instead of bread rolls. The technique remains identical, just with flavor profile adjustments.
Serving and Presentation Guide
For traditional presentation, dust cooled Nuns Puffs generously with powdered sugar using a fine-mesh sieve. Arrange on a decorative platter or cake stand for maximum visual impact. For special occasions, serve with a bowl of lightly sweetened whipped cream or pastry cream for dipping. Fresh berries make an elegant accompaniment, adding color and freshness.
At breakfast or brunch, serve warm with jam or honey. For afternoon tea, present on a tiered stand with other petits fours. If filling the puffs (a modern adaptation), use a piping bag with a small tip to inject cream or custard through the bottom. This keeps the tops pristine while adding luxurious richness.
Wine and Beverage Pairing
Classic Nuns Puffs pair beautifully with lightly sweet sparkling wines like Moscato d’Asti or demi-sec Champagne. The bubbles cleanse the palate between bites of the rich pastry. For non-alcoholic options, try floral teas like Earl Grey or jasmine – their aroma complements the pastry’s subtle flavors. In colder months, hot chocolate or spiced chai make comforting companions.
With savory variations, dry white wines like Sauvignon Blanc or unoaked Chardonnay work well. For coffee lovers, a medium-roast coffee with caramel notes enhances the pastry’s buttery flavor without overpowering it. Avoid strongly flavored beverages that might overwhelm these delicate pastries.
Storage and Shelf Life
Properly stored in an airtight container at room temperature, Nuns Puffs keep well for 1-2 days. For longer storage, freeze unfilled puffs in a single layer before transferring to freezer bags. They’ll keep for up to a month frozen. To refresh, place frozen puffs in a 300°F oven for 5-8 minutes until crisp.
Avoid refrigeration, as it causes the pastries to become soggy. If puffs soften, you can crisp them briefly in a warm oven. Filled puffs should be consumed the same day, as the moisture from fillings will soften the pastry. For best quality, fill just before serving whenever possible.
Make Ahead Strategies
Nuns Puffs are excellent candidates for advance preparation. The dough can be made up to a day ahead and refrigerated in a piping bag. Let it come to room temperature before using, then pipe and bake as directed. Alternatively, pipe the dough onto baking sheets, freeze until solid, then transfer to freezer bags for up to a month. Bake directly from frozen, adding a few extra minutes to the baking time.
For last-minute entertaining, bake the puffs up to 8 hours ahead and store at room temperature. Refresh in a 300°F oven for 3-5 minutes before serving. This make-ahead flexibility makes them perfect for stress-free entertaining when you want to impress guests with minimal last-minute effort.
Scaling Instructions
This recipe scales beautifully for different needs. To halve, use 2 eggs (beat one and use half) and adjust other ingredients proportionally. For larger batches, double or triple all ingredients exactly. When scaling up, bake in multiple batches rather than overcrowding the oven, as steam circulation is crucial for proper rising.
Equipment needs change with scale – for large batches, use multiple baking sheets and rotate them in the oven for even cooking. Mixing times may increase slightly when multiplying the recipe. Allow extra time for piping larger quantities, as the dough is easiest to work with when freshly made.
Nutritional Deep Dive
While Nuns Puffs are a treat, they’re relatively light compared to many pastries. Each puff contains about 100 calories, with most coming from the butter and eggs. They provide small amounts of protein (about 2g per puff) from the eggs, and minimal sugar when made as written. The high air content means you’re actually eating less dough than the size would suggest.
For those watching sugar intake, the recipe can be made with reduced sugar (cut by half) without significantly affecting texture. While not a health food, these pastries offer portion-controlled indulgence. Compared to denser pastries like croissants or muffins, they provide satisfying elegance with relatively modest caloric impact.
Dietary Adaptations
Gluten-Free Version
Replace all-purpose flour with a gluten-free flour blend formulated for baking. Look for one containing xanthan gum, or add 1/2 teaspoon per cup of flour. The texture may be slightly more delicate, so handle the dough gently. Bake on parchment paper to prevent sticking, as gluten-free versions can be more fragile.
Vegan Adaptation
Substitute butter with vegan margarine and use a commercial egg replacer suitable for baking. Increase baking powder slightly (about 1/2 teaspoon) to help with rising. The results will differ from traditional but can still be delicious. Coconut oil can work for the fat, though the flavor will be noticeably different.
Troubleshooting Guide
Puffs Don’t Rise Properly
If your Nuns Puffs don’t achieve their characteristic height, the dough may have been too wet or the oven temperature too low. Ensure you cook the flour mixture thoroughly before adding eggs, and use an oven thermometer to verify temperature. Opening the oven door too soon can also cause collapsing.
Puffs Are Dense Inside
A dense interior usually indicates underbaking. These pastries need sufficient time to dry out inside after the initial rise. If they brown too quickly, reduce oven temperature slightly and extend baking time. Properly baked puffs should be mostly hollow with just a few strands of cooked dough inside.
Frequently Asked Questions
Can I make Nuns Puffs without a piping bag?
Yes, you can use two spoons to form mounds of dough, though the shape won’t be as uniform. For best results without a piping bag, fill a heavy-duty plastic bag and snip off one corner to create a makeshift piping bag. The ridged star tip does give the traditional appearance, but isn’t essential for taste.
Why did my puffs collapse after baking?
Collapsing usually indicates underbaking or premature oven opening. The structure sets as moisture evaporates, so they need sufficient time. If removed too soon, steam inside condenses, causing collapse. Next time, bake until deeply golden and crisp, and let them cool gradually in the turned-off oven with the door ajar.
Can I freeze baked Nuns Puffs?
Absolutely! Freeze completely cooled puffs in a single layer before transferring to airtight containers. To serve, refresh in a 300°F oven for 5-8 minutes until crisp. They won’t be quite as perfect as fresh, but still delicious. Avoid freezing filled puffs, as the moisture will make them soggy.
Additional Resources
For those who love mastering French pastry techniques, consider exploring choux pastry variations like éclairs, cream puffs, or gougères. Our guide to French baking terms can help decode recipe instructions, while equipment reviews cover the best piping bags and tips for home bakers. Seasonal variations might include pumpkin spice in fall or citrus in winter.
For visual learners, video tutorials on choux pastry technique can be invaluable. Many baking schools offer online classes focusing on French pastry fundamentals. Historical cookbooks provide fascinating insights into how these recipes evolved from convent kitchens to modern patisseries.
Join the Conversation
We’d love to see your Nuns Puffs creations! Share photos on Instagram with #NunsPuffsPerfection and tag us @FrenchPastryLovers. Tell us about your variations – did you add unique flavors or serve them for a special occasion? Your feedback helps us create even better recipes.
Have questions or tips to share? Join our baking community forum where enthusiasts discuss techniques, troubleshoot issues, and celebrate successes. We regularly feature reader recipes and adaptations, so your version could inspire others. Happy baking!
The Recipe
Nuns Puffs
Serves: 12
Prep Time: 20 mins
Cook Time: 25 mins
Total Time: 45 mins
Kitchen Equipment Needed
- Medium saucepan
- Wooden spoon
- Stand mixer or electric hand mixer
- Piping bag with large star tip (about 1/2 inch)
- Baking sheets
- Parchment paper or silicone mats
Ingredients
- 1 cup water
- 1/2 cup (1 stick) unsalted butter
- 1/4 teaspoon salt
- 1 tablespoon granulated sugar
- 1 cup all-purpose flour
- 4 large eggs, room temperature
- 1 teaspoon vanilla extract
- Powdered sugar for dusting
Directions
- Preheat oven to 425°F (220°C). Line baking sheets with parchment or silicone mats.
- In a medium saucepan, combine water, butter, salt, and sugar. Bring to a full boil over medium heat.
- Remove from heat and add flour all at once. Stir vigorously with a wooden spoon until mixture forms a smooth ball that pulls away from pan sides.
- Transfer dough to a mixing bowl. Let cool for 2-3 minutes.
- Using an electric mixer on medium speed, add eggs one at a time, beating well after each addition until fully incorporated. Dough should be smooth and glossy.
- Beat in vanilla extract.
- Transfer dough to a piping bag fitted with a large star tip. Pipe 1 1/2-inch mounds onto prepared sheets, spacing 2 inches apart.
- Bake for 15 minutes at 425°F, then reduce temperature to 375°F (190°C) and bake 10 minutes more until deep golden brown.
- Turn off oven, crack door slightly, and let puffs dry for 5 minutes before removing.
- Cool completely on a wire rack. Dust generously with powdered sugar before serving.
Recipe Notes
- For crisper puffs, pierce the side of each with a skewer after baking to release steam.
- If puffs start browning too quickly, tent loosely with foil during the last 10 minutes.
- Dough can be refrigerated for up to 24 hours before piping and baking.