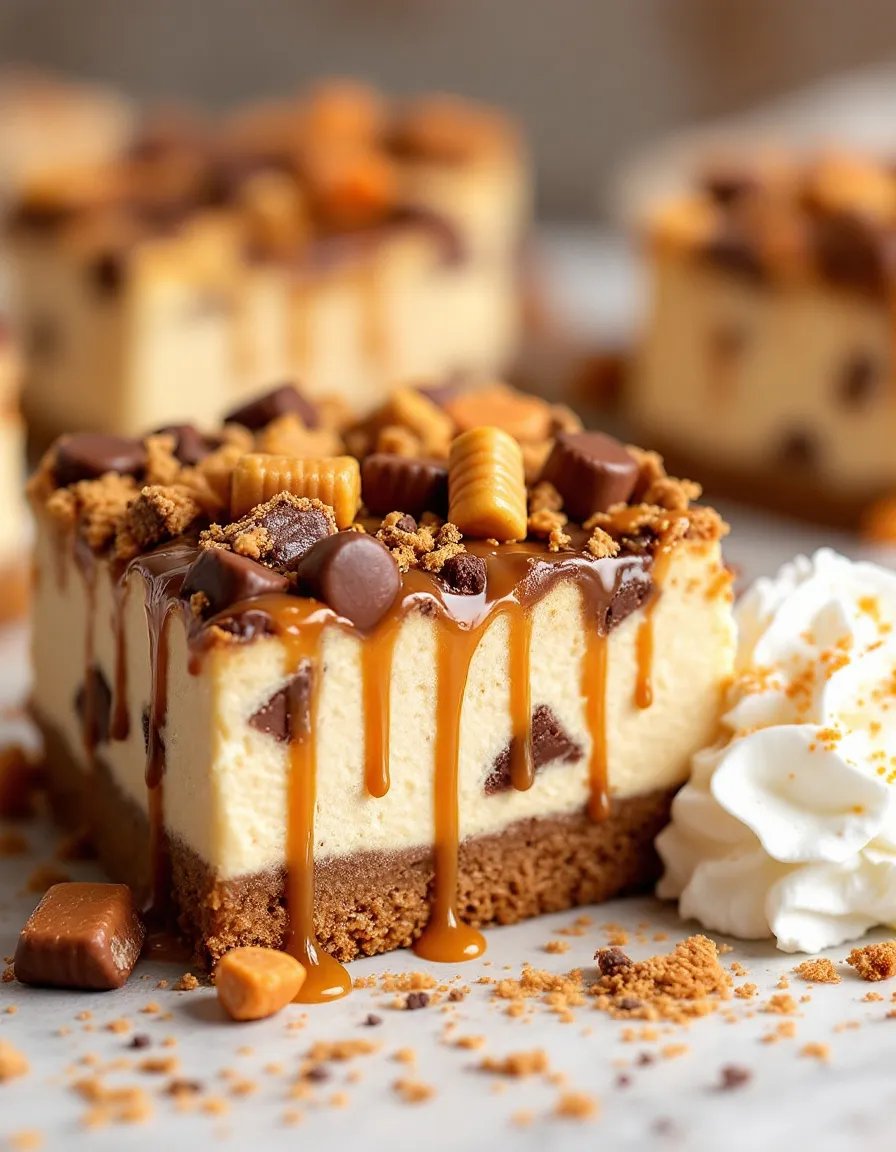
Reese’s Butterfinger Cheesecake Bars Recipe | Decadent Dessert Idea 🍰🍫
Indulge in the ultimate dessert experience with these Reese’s Butterfinger Cheesecake Bars. Combining the creamy richness of cheesecake with the irresistible crunch of Butterfinger and the smooth decadence of Reese’s peanut butter cups, this dessert is a chocolate lover’s dream. Perfect for parties, potlucks, or simply treating yourself, these bars are guaranteed to impress.
Imagine biting into a velvety cheesecake layer, perfectly balanced with a buttery graham cracker crust, and topped with a generous drizzle of chocolate and crushed Butterfinger pieces. The combination of textures and flavors creates a symphony in your mouth, making every bite unforgettable. Whether you’re a seasoned baker or a beginner, this recipe is straightforward and rewarding.
Quick Recipe Highlights
- Flavor Profile: A harmonious blend of creamy cheesecake, rich chocolate, and nutty peanut butter.
- Texture: Smooth and velvety cheesecake paired with a crunchy graham cracker crust and crispy Butterfinger topping.
- Aroma: The enticing scent of chocolate and peanut butter will fill your kitchen, making it impossible to resist.
- Visual Appeal: These bars are a feast for the eyes, with layers of creamy cheesecake, chocolate drizzle, and golden Butterfinger pieces.
- Skill Level Needed: Intermediate, with simple steps that are easy to follow.
- Special Equipment: A 9×9 inch baking pan, mixing bowls, and an electric mixer.
Recipe Overview
- Difficulty Level: This recipe is perfect for those with some baking experience, as it involves layering and baking techniques.
- Category: Dessert, Cheesecake, Bars.
- Cuisine: American, with a modern twist on classic flavors.
- Cost: Approximately $15-$20, depending on ingredient quality and availability.
- Season: Ideal for any season, but especially comforting during the holidays.
- Occasion: Perfect for birthdays, holidays, or any special celebration.
Why You’ll Love This Recipe
These Reese’s Butterfinger Cheesecake Bars are a true crowd-pleaser. The combination of creamy cheesecake, crunchy Butterfinger, and smooth chocolate creates a dessert that’s both indulgent and satisfying. The recipe is straightforward, making it accessible for bakers of all skill levels. Plus, the bars can be made ahead of time, making them a convenient option for entertaining.
From a nutritional standpoint, while these bars are a treat, they can be enjoyed in moderation as part of a balanced diet. The peanut butter provides a good source of protein, and the chocolate offers a dose of antioxidants. Plus, the joy and satisfaction of sharing a homemade dessert with loved ones are priceless.
Socially, these bars are a hit at any gathering. Their rich flavors and beautiful presentation make them a standout dessert that will have everyone asking for the recipe. They’re also cost-effective, using readily available ingredients to create a dessert that feels luxurious without breaking the bank.
Accessibility is another key benefit. The ingredients are easy to find, and the recipe doesn’t require any specialized equipment. Whether you’re baking for a party or just treating yourself, these bars are a fantastic choice.
Finally, the versatility of this recipe is a major plus. You can easily adapt it to suit different dietary needs or preferences, making it a go-to dessert for any occasion.
Historical Background and Cultural Significance
Cheesecake has a rich history dating back to ancient Greece, where it was served to athletes during the first Olympic games. Over the centuries, the recipe evolved, with each culture adding its own twist. The modern American cheesecake, known for its creamy texture and rich flavor, became popular in the 20th century.
Butterfinger and Reese’s, two iconic American candy brands, have been beloved for decades. Butterfinger, with its crispy, flaky layers, and Reese’s, with its perfect blend of chocolate and peanut butter, have become staples in American desserts. Combining these two classics with cheesecake creates a dessert that’s both nostalgic and innovative.
The evolution of this recipe reflects the creativity and adaptability of modern baking. By blending traditional cheesecake techniques with contemporary flavors, this recipe offers a fresh take on a classic dessert. It’s a testament to how food can bring people together, creating new traditions while honoring the past.
Regionally, this recipe has a distinctly American flair, but its universal appeal makes it a favorite worldwide. Whether you’re in the heart of the U.S. or across the globe, the combination of chocolate, peanut butter, and cheesecake is a winning formula.
Ingredient Deep Dive
Cream Cheese: The backbone of any cheesecake, cream cheese provides the rich, creamy texture that makes this dessert so indulgent. Opt for full-fat cream cheese for the best results, as it offers a smoother consistency and richer flavor. Store it in the refrigerator and bring it to room temperature before use to ensure a lump-free batter.
Graham Crackers: These form the base of the crust, providing a sweet, crunchy contrast to the creamy filling. Look for high-quality graham crackers, or try a gluten-free version if needed. Store them in an airtight container to maintain their crispness.
Butterfinger: The star of the topping, Butterfinger adds a delightful crunch and a hint of caramel flavor. Crush the bars just before using to preserve their texture. If Butterfinger isn’t available, you can substitute with another crunchy candy bar.
Reese’s Peanut Butter Cups: These add a layer of rich peanut butter flavor that complements the chocolate and cheesecake perfectly. Use mini cups for easier distribution, or chop regular-sized cups into smaller pieces. Store them in a cool, dry place to prevent melting.
Chocolate: A high-quality chocolate is essential for the drizzle. Choose a semi-sweet or dark chocolate for a balanced flavor. Store chocolate in a cool, dry place, and melt it gently to avoid burning.
Common Mistakes to Avoid
- Overmixing the Batter: Overmixing can incorporate too much air, leading to cracks in the cheesecake. Mix just until ingredients are combined.
- Not Using Room Temperature Ingredients: Cold ingredients can result in a lumpy batter. Ensure all ingredients are at room temperature before mixing.
- Overbaking: Cheesecake should be slightly jiggly in the center when removed from the oven. Overbaking can cause it to dry out and crack.
- Skipping the Water Bath: A water bath helps regulate the temperature, preventing cracks. Don’t skip this step for a smooth, even bake.
- Not Letting it Cool Gradually: Sudden temperature changes can cause cracks. Let the cheesecake cool in the oven with the door slightly open before refrigerating.
- Using Low-Quality Ingredients: The quality of your ingredients directly affects the final product. Opt for high-quality chocolate, cream cheese, and candy bars.
- Rushing the Chilling Process: Cheesecake needs time to set. Chill it for at least 4 hours, or overnight, for the best texture.
- Not Crushing the Candy Bars Properly: Unevenly crushed candy bars can result in an inconsistent texture. Use a food processor or rolling pin for even pieces.
Essential Techniques
Creating the Perfect Crust: The crust is the foundation of your cheesecake bars. Combine crushed graham crackers with melted butter and press firmly into the pan. Use the bottom of a glass to ensure an even layer. Pre-bake the crust for a few minutes to set it, preventing it from becoming soggy.
Mixing the Cheesecake Batter: Start by beating the cream cheese until smooth, then gradually add the sugar. Incorporate the eggs one at a time, mixing just until combined. Overmixing can introduce too much air, leading to cracks. Finally, fold in any additional flavorings or mix-ins gently.
Baking in a Water Bath: A water bath helps regulate the oven temperature, ensuring even baking and preventing cracks. Wrap the bottom of your springform pan in aluminum foil to prevent water from seeping in. Place the pan in a larger baking dish and fill it with hot water halfway up the sides of the springform pan.
Cooling and Chilling: After baking, let the cheesecake cool in the oven with the door slightly open for about an hour. This gradual cooling process helps prevent cracks. Once at room temperature, refrigerate the cheesecake for at least 4 hours, or overnight, to set completely.
Pro Tips for Perfect Reese’s Butterfinger Cheesecake Bars
- Use a springform pan for easy removal and clean slices.
- Line the pan with parchment paper for effortless lifting and serving.
- Crush the Butterfinger bars just before using to maintain their crunch.
- For a smoother cheesecake, strain the batter through a fine-mesh sieve.
- Add a splash of vanilla extract to enhance the flavor profile.
- Use a piping bag for precise chocolate drizzle on top.
- Garnish with extra crushed Butterfinger and Reese’s pieces for added texture and visual appeal.
- Let the cheesecake bars come to room temperature before serving for the best flavor and texture.
Variations and Adaptations
Regional Variations: In the South, you might find a version with a pecan crust, while in the Northeast, a graham cracker crust is more common. Experiment with different crusts to suit your regional preferences.
Seasonal Adaptations: For a festive twist, add crushed peppermint candies during the holidays or fresh berries in the summer. These additions can bring a seasonal flair to your cheesecake bars.
Dietary Modifications: For a gluten-free version, use gluten-free graham crackers or almond flour for the crust. For a dairy-free option, substitute the cream cheese with a plant-based alternative and use dairy-free chocolate.
Flavor Variations: Swap out the Butterfinger for other candy bars like Snickers or Kit Kat for a different flavor profile. You can also experiment with different types of chocolate, such as white or milk chocolate, for the drizzle.
Texture Modifications: For a smoother texture, blend the cheesecake batter until completely smooth. For a chunkier texture, add larger pieces of candy bars or nuts to the batter.
Presentation Alternatives: Instead of bars, you can make individual cheesecake cups by using a muffin tin. Top each cup with a mini Reese’s peanut butter cup for a cute and portable dessert option.
Serving and Presentation Guide
Plating Techniques: Serve the cheesecake bars on a decorative platter or cake stand. Use a sharp knife to cut clean slices, wiping the blade between cuts for neat edges.
Garnishing Ideas: Top each bar with a drizzle of melted chocolate, a sprinkle of crushed Butterfinger, and a mini Reese’s peanut butter cup for a professional finish.
Traditional Accompaniments: Pair the bars with a dollop of whipped cream or a scoop of vanilla ice cream for a classic dessert experience.
Modern Serving Suggestions: For a contemporary twist, serve the bars with a side of salted caramel sauce or a dusting of cocoa powder.
Temperature Considerations: Serve the bars chilled for the best texture and flavor. If they’ve been in the fridge for a while, let them sit at room temperature for about 10 minutes before serving.
Portion Control Tips: Cut the bars into smaller pieces for a bite-sized treat, perfect for parties or buffets. Alternatively, cut larger slices for a more indulgent dessert.
Wine and Beverage Pairing
Wine Pairings: A sweet dessert wine like Moscato or a rich Port complements the creamy cheesecake and chocolate flavors. For a more balanced pairing, try a semi-sweet Riesling.
Non-Alcoholic Alternatives: A glass of cold milk or a creamy milkshake pairs wonderfully with the rich flavors of the cheesecake bars. For a caffeine boost, try a cup of coffee or espresso.
Coffee/Tea Pairings: A dark roast coffee or a chai tea latte enhances the chocolate and peanut butter flavors. The warmth of the beverage contrasts nicely with the chilled cheesecake.
Temperature Considerations: Serve beverages at their optimal temperature—cold for milk and milkshakes, hot for coffee and tea. This ensures the best flavor experience.
Serving Suggestions: Offer a variety of beverage options to cater to different preferences. A well-rounded dessert spread includes both alcoholic and non-alcoholic choices.
Storage and Shelf Life
Storage Methods: Store the cheesecake bars in an airtight container in the refrigerator. This keeps them fresh and prevents them from absorbing other odors.
Temperature Requirements: Keep the bars chilled at all times. They should not be left out at room temperature for more than 2 hours to prevent spoilage.
Container Recommendations: Use a glass or plastic container with a tight-fitting lid. If stacking the bars, place a layer of parchment paper between them to prevent sticking.
Signs of Spoilage: Discard the bars if you notice any mold, off smells, or changes in texture. Fresh cheesecake bars should have a smooth, creamy consistency.
Reheating Instructions: These bars are best served cold, but if you prefer them slightly warmed, microwave individual slices for 10-15 seconds.
Freezing Guidelines: To freeze, wrap individual bars in plastic wrap and place them in a freezer-safe container. They can be stored for up to 2 months. Thaw in the refrigerator before serving.
Make Ahead Strategies
Prep Timeline: You can prepare the crust and cheesecake batter a day in advance. Store the crust in the pan and the batter in the refrigerator, then assemble and bake the next day.
Storage Between Steps: Keep the crust covered with plastic wrap and the batter in an airtight container. This prevents drying out and maintains freshness.
Quality Impact Assessment: Making ahead can enhance the flavors as the ingredients have time to meld. However, avoid freezing the assembled bars before baking, as this can affect the texture.
Assembly Tips: When ready to bake, let the batter come to room temperature before pouring it over the crust. This ensures even baking and a smooth texture.
Reheating Guidelines: If you’ve baked the bars ahead of time, let them cool completely before refrigerating. Serve chilled or slightly warmed, depending on preference.
Fresh Element Additions: Add fresh garnishes like whipped cream or fruit just before serving to maintain their texture and appearance.
Scaling Instructions
Halving the Recipe: To make a smaller batch, simply halve all the ingredients. Use a smaller baking pan, such as an 8×8 inch, and adjust the baking time accordingly.
Doubling or Tripling: For larger gatherings, double or triple the ingredients. Use a larger baking pan or multiple pans, and monitor the baking time closely to prevent overbaking.
Equipment Adjustments: When scaling up, ensure you have enough mixing bowls and baking pans. A stand mixer can be helpful for larger batches.
Timing Modifications: Larger batches may require slightly longer baking times. Check for doneness by testing the center with a toothpick—it should come out clean.
Storage Considerations: Store extra bars in the refrigerator or freezer, following the same guidelines as the original recipe. This ensures they stay fresh and delicious.
Nutritional Deep Dive
Macro Breakdown: Each bar contains a balance of carbohydrates, fats, and proteins. The graham cracker crust provides carbs, while the cream cheese and peanut butter contribute fats and proteins.
Micronutrient Analysis: The bars offer small amounts of calcium from the cream cheese and iron from the chocolate. Peanut butter also provides some vitamin E and magnesium.
Health Benefits: While indulgent, these bars can be part of a balanced diet. The peanut butter offers protein and healthy fats, while the chocolate provides antioxidants.
Dietary Considerations: Be mindful of portion sizes, as these bars are calorie-dense. They can be enjoyed as an occasional treat within a balanced diet.
Portion Analysis: Cutting the bars into smaller pieces can help with portion control. This allows you to enjoy the flavors without overindulging.
Weight Management Tips: Pair a small portion of the bars with a healthy meal or snack to balance your overall calorie intake. Enjoy them as part of a varied and balanced diet.
Dietary Adaptations
Gluten-Free: Use gluten-free graham crackers or almond flour for the crust. Ensure all other ingredients are certified gluten-free.
Dairy-Free: Substitute the cream cheese with a plant-based alternative and use dairy-free chocolate. Check that the peanut butter and candy bars are also dairy-free.
Vegan: Use vegan cream cheese, dairy-free chocolate, and egg substitutes like flaxseed or chia eggs. Ensure all other ingredients are vegan-friendly.
Low-Carb: Replace the graham crackers with a low-carb crust made from almond flour and sweetener. Use sugar-free chocolate and peanut butter.
Keto: Follow the low-carb adaptations and ensure all ingredients are keto-friendly. Use a keto-approved sweetener in the cheesecake batter.
Paleo: Use a paleo-friendly crust made from nuts and seeds. Substitute the cream cheese with a paleo-approved alternative and use dark chocolate.
Low-FODMAP: Use lactose-free cream cheese and ensure the peanut butter and chocolate are low-FODMAP. Adjust the crust ingredients as needed.
Other Specific Diets: Adapt the recipe to suit other dietary needs by substituting ingredients as necessary. Always check labels to ensure compliance with your specific diet.
Troubleshooting Guide
Texture Issues: If the cheesecake is too dense, ensure you’re not overmixing the batter. If it’s too runny, check that the cream cheese was at room temperature and that the eggs were fully incorporated.
Flavor Balance: If the bars are too sweet, reduce the sugar in the cheesecake batter. If they’re not sweet enough, add a bit more sugar or a drizzle of honey.
Temperature Problems: If the cheesecake cracks, it may have been baked at too high a temperature or cooled too quickly. Use a water bath and let it cool gradually.
Equipment Challenges: If you don’t have a springform pan, use a regular baking pan lined with parchment paper. Ensure the pan is well-greased to prevent sticking.
Ingredient Substitutions: If you’re out of an ingredient, use a suitable substitute. For example, use digestive biscuits instead of graham crackers for the crust.
Timing Concerns: If the cheesecake isn’t setting, it may need more time in the oven. Check for doneness by testing the center with a toothpick.
Recipe Success Stories
Community Feedback: Many readers have shared their success stories, praising the rich flavors and easy-to-follow instructions. Some have even added their own twists, like using different candy bars or adding a layer of caramel.
Variation Successes: One reader created a gluten-free version using almond flour, which turned out beautifully. Another made a vegan version with cashew cream cheese, which was a hit at their family gathering.
Adaptation Stories: A baker shared how they adapted the recipe for a low-carb diet, using sugar-free chocolate and a nut-based crust. The result was a delicious, guilt-free treat.
Reader Suggestions: Several readers suggested adding a layer of ganache on top for extra richness. Others recommended serving the bars with a side of fresh berries for a refreshing contrast.
Photography Tips: A food blogger shared their tips for photographing the bars, suggesting natural light and a simple backdrop to let the dessert shine. They also recommended garnishing with extra candy pieces for added visual appeal.
Frequently Asked Questions
Q: Can I use a different type of candy bar?
A: Yes, you can substitute Butterfinger with other crunchy candy bars like Snickers or Kit Kat. Just ensure they’re chopped into small pieces for even distribution.
Q: How do I prevent the cheesecake from cracking?
A: Avoid overmixing the batter, use a water bath, and let the cheesecake cool gradually in the oven with the door slightly open.
Q: Can I make these bars ahead of time?
A: Yes, you can prepare the crust and batter a day in advance. Assemble and bake the next day, then chill before serving.
Q: How long do these bars last in the fridge?
A: They can be stored in an airtight container in the refrigerator for up to 5 days. For longer storage, freeze them for up to 2 months.
Q: Can I make these bars gluten-free?
A: Absolutely! Use gluten-free graham crackers or almond flour for the crust, and ensure all other ingredients are gluten-free.
Q: What’s the best way to cut clean slices?
A: Use a sharp knife dipped in hot water and wiped clean between cuts. This ensures neat, clean edges.
Q: Can I use a different type of chocolate for the drizzle?
A: Yes, you can use milk, dark, or white chocolate, depending on your preference. Just ensure it’s high-quality for the best flavor.
Q: How do I know when the cheesecake is done baking?
A: The edges should be set, and the center should be slightly jiggly. A toothpick inserted into the center should come out clean.
Q: Can I freeze these bars?
A: Yes, wrap individual bars in plastic wrap and store them in a freezer-safe container for up to 2 months. Thaw in the refrigerator before serving.
Q: What’s the best way to serve these bars?
A: Serve them chilled, garnished with extra crushed Butterfinger and a drizzle of chocolate. Pair with a glass of milk or a cup of coffee for a delightful treat.
Additional Resources
Related Recipes: Explore other decadent desserts like chocolate lava cake, peanut butter pie, or classic New York cheesecake. These recipes offer similar rich flavors and textures.
Technique Guides: Learn more about essential baking techniques, such as creating the perfect crust, mastering the water bath, and achieving a smooth cheesecake batter.
Ingredient Information: Dive deeper into the history and uses of key ingredients like cream cheese, graham crackers, and chocolate. Discover their nutritional benefits and storage tips.
Equipment Recommendations: Find recommendations for essential baking tools, from springform pans to stand mixers. Investing in quality equipment can elevate your baking game.
Seasonal Variations: Adapt this recipe for different seasons by incorporating seasonal fruits, spices, or candy. For example, add pumpkin spice in the fall or fresh berries in the summer.
Join the Conversation
Social Media Sharing: Share your creations on social media using the hashtag #ReesesButterfingerCheesecakeBars. Connect with other bakers and exchange tips and variations.
Photography Tips: Capture stunning photos of your bars by using natural light, simple backdrops, and garnishes. Experiment with different angles and compositions to showcase your dessert.
Recipe Reviews: Leave a review and share your experience with the recipe. Your feedback helps others and provides valuable insights for future improvements.
Community Engagement: Join online baking communities to share your creations, ask questions, and learn from others. Engaging with fellow bakers can inspire new ideas and techniques.
Recipe Variations: Experiment with different ingredients and techniques to create your own unique version of these bars. Share your variations and inspire others to try new flavors.
The Recipe
Reese’s Butterfinger Cheesecake Bars
Serves: 12
Prep Time: 20 mins
Cook Time: 40 mins
Total Time: 60 mins
Kitchen Equipment Needed
- 9×9 inch baking pan
- Mixing bowls
- Electric mixer
- Measuring cups and spoons
- Spatula
- Parchment paper
Ingredients
- 2 cups graham cracker crumbs
- 1/2 cup unsalted butter, melted
- 16 oz cream cheese, softened
- 1/2 cup granulated sugar
- 2 large eggs
- 1 tsp vanilla extract
- 1 cup crushed Butterfinger bars
- 1 cup mini Reese’s peanut butter cups, chopped
- 1/2 cup semi-sweet chocolate chips, melted
Directions
- Preheat your oven to 325°F (160°C). Line a 9×9 inch baking pan with parchment paper, leaving an overhang on the sides for easy removal.
- In a medium bowl, combine the graham cracker crumbs and melted butter. Press the mixture firmly into the bottom of the prepared pan. Bake for 10 minutes, then remove from the oven and let cool slightly.
- In a large bowl, beat the cream cheese until smooth. Gradually add the sugar, mixing until well combined. Add the eggs one at a time, mixing just until incorporated. Stir in the vanilla extract.
- Fold in half of the crushed Butterfinger bars and half of the chopped Reese’s peanut butter cups. Pour the batter over the cooled crust, spreading it evenly.
- Bake for 30-35 minutes, or until the edges are set and the center is slightly jiggly. Remove from the oven and let cool in the pan for 1 hour.
- Refrigerate for at least 4 hours, or overnight, to set completely. Once chilled, lift the cheesecake out of the pan using the parchment paper overhang.
- Drizzle the melted chocolate over the top and sprinkle with the remaining crushed Butterfinger and Reese’s pieces. Cut into bars and serve.
Recipe Notes
- For a smoother cheesecake, strain the batter through a fine-mesh sieve before pouring it over the crust.
- If you don’t have a springform pan, you can use a regular baking pan lined with parchment paper.
- Store leftovers in an airtight container in the refrigerator for up to 5 days, or freeze for up to 2 months.