St. Patrick’s Day Jello Cups: Festive & Fun Treats for the Whole Family
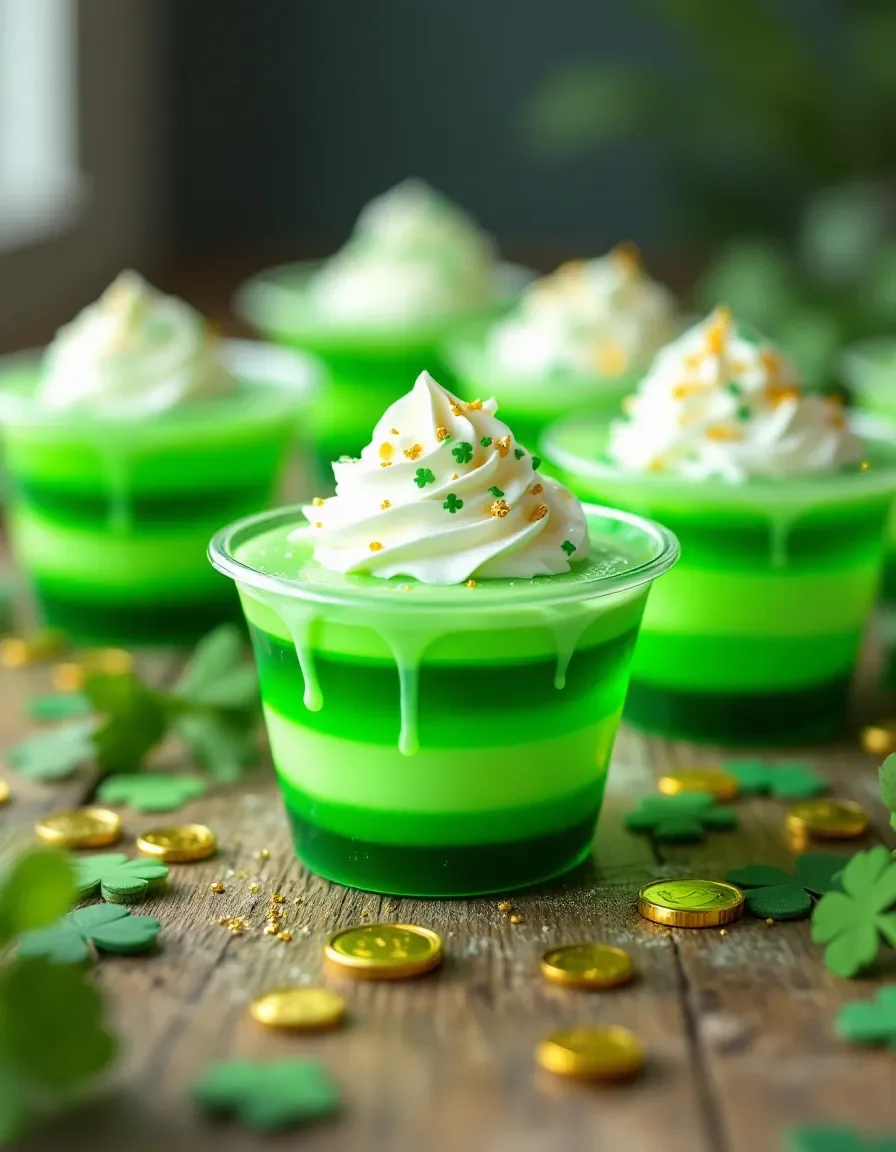
Celebrate St. Patrick’s Day with these vibrant and delicious St. Patrick’s Day Jello Cups! These festive treats are perfect for parties, family gatherings, or just a fun way to add some Irish cheer to your day. With layers of green and white jello, these cups are as visually appealing as they are tasty.
The best part about these St. Patrick’s Day Jello Cups is how simple they are to make. With just a few ingredients and minimal prep time, you can create a dessert that will impress your guests. The combination of sweet jello and creamy layers makes for a delightful texture that both kids and adults will love. Plus, they’re a great make-ahead dessert, so you can focus on enjoying the festivities.
Quick Recipe Highlights
- Flavor Profile: Sweet and refreshing with a creamy contrast. The lime jello provides a tangy burst, while the sweetened condensed milk layer adds a smooth, rich flavor.
- Texture: Silky smooth jello layers with a velvety cream layer in between, creating a delightful mouthfeel.
- Aroma: Bright citrus notes from the lime jello blend with the subtle sweetness of the milk layer.
- Visual Appeal: Striking green and white layers that capture the spirit of St. Patrick’s Day, perfect for festive tables.
- Skill Level Needed: Beginner-friendly with no cooking required—just layering and chilling.
- Special Equipment: Clear plastic cups or glass dessert dishes to showcase the colorful layers.
Recipe Overview
- Difficulty Level: This recipe is incredibly easy, making it perfect for beginners or anyone short on time. The only skill required is patience while the layers set.
- Category: Dessert, Holiday Treat, No-Bake.
- Cuisine: American with Irish-inspired festive elements.
- Cost: Budget-friendly, using simple ingredients like jello and sweetened condensed milk.
- Season: Ideal for St. Patrick’s Day celebrations in March.
- Occasion: Perfect for parties, potlucks, or family gatherings during the holiday.
Why You’ll Love This Recipe
These St. Patrick’s Day Jello Cups are not only delicious but also incredibly fun to make and serve. The layers of vibrant green and creamy white create a stunning visual effect that’s sure to be a hit at any gathering. The contrast between the tangy lime jello and the sweet, smooth milk layer makes every bite a delightful experience.
One of the best things about this recipe is its simplicity. With no baking required, it’s a stress-free dessert that comes together with minimal effort. You can prepare it ahead of time, allowing the layers to set perfectly while you focus on other party preparations. It’s a great way to involve kids in the kitchen too—they’ll love helping to create the colorful layers.
Nutritionally, these jello cups are a lighter dessert option compared to many traditional St. Patrick’s Day treats. Using sugar-free jello can make them even lighter without sacrificing flavor. The sweetened condensed milk adds a touch of richness, but the portion-controlled cups help keep indulgence in check.
From a social perspective, these jello cups are perfect for entertaining. Their individual serving size makes them ideal for parties, and their festive appearance adds to the holiday ambiance. They’re also a great conversation starter—guests will be impressed by the beautiful layers and fun presentation.
Cost-wise, this recipe is very economical. The ingredients are affordable and readily available at any grocery store. You can easily scale the recipe up or down depending on your needs, making it versatile for both small family gatherings and large parties.
Historical Background and Cultural Significance
Jello desserts have been a staple in American cuisine since the early 20th century, gaining popularity for their convenience and versatility. The introduction of flavored gelatin powders made it easy for home cooks to create colorful, molded desserts that were perfect for special occasions. St. Patrick’s Day, with its emphasis on green-themed foods, naturally became a perfect match for lime or green apple jello creations.
In Irish culture, while jello isn’t a traditional dessert, the American adaptation of using green foods to celebrate St. Patrick’s Day has become widely accepted. The holiday, originally a religious feast day for the patron saint of Ireland, has evolved into a global celebration of Irish culture, often marked by parades, green attire, and themed foods.
The layered jello dessert concept likely originated from the mid-century American fascination with molded salads and desserts. The combination of jello with dairy products like sweetened condensed milk or cream cheese became popular for creating visually striking desserts with contrasting textures. This particular version for St. Patrick’s Day plays on that tradition while incorporating the holiday’s signature green color.
Over time, these St. Patrick’s Day Jello Cups have become a fun, modern tradition for many families, especially those with young children who enjoy the bright colors and sweet flavors. They represent a playful take on holiday cooking that bridges traditional Irish celebrations with contemporary American dessert trends.
Ingredient Deep Dive
Lime Jello
Lime jello forms the vibrant green layers in these festive cups. Gelatin desserts became popular in America after Charles Knox developed powdered gelatin in the late 19th century, making it accessible to home cooks. The bright green color perfectly captures the spirit of St. Patrick’s Day. Nutritionally, standard jello is low in calories but high in sugar, though sugar-free options are available. For best results, use name-brand jello as it tends to set more reliably than generic versions.
When preparing the jello layers, be sure to dissolve the powder completely in hot water before adding cold water. This ensures a smooth texture without graininess. If you want to experiment with flavors, you could try using green apple or kiwi jello for slightly different taste profiles while maintaining the festive green color.
Sweetened Condensed Milk
Sweetened condensed milk creates the creamy white layers that contrast beautifully with the green jello. This ingredient was developed in the 19th century as a way to preserve milk without refrigeration. It adds richness and sweetness to the dessert while helping the layers hold their shape. Nutritionally, it’s high in sugar and calories, but a little goes a long way in this recipe.
For those looking to reduce sugar, you could experiment with using evaporated milk mixed with a sugar substitute, though the texture might be slightly different. When working with sweetened condensed milk, be sure to mix it thoroughly with the gelatin to ensure even distribution and proper setting of the cream layers.
Common Mistakes to Avoid
- Not allowing layers to fully set: Rushing the process will cause the layers to mix. Each layer needs at least 30 minutes in the refrigerator before adding the next.
- Using warm jello mixture: Always let the jello cool slightly before pouring over set layers to prevent melting.
- Incorrect gelatin measurements: Too little gelatin will result in runny layers, while too much can make the texture rubbery.
- Uneven layering: Pour each layer carefully and evenly to maintain distinct color separation.
- Not greasing cups (if using molds): For shaped desserts, a light coating of cooking spray helps with unmolding.
- Overfilling cups: Leave some room at the top for easy serving and possible garnishes.
- Storing at room temperature: These must be kept refrigerated until serving to maintain texture.
- Skipping the stirring time: Mix the jello powder thoroughly to avoid clumps in the final product.
Essential Techniques
Proper Jello Dissolving
Dissolving the jello powder completely is crucial for smooth layers. Always use boiling water first to fully dissolve the gelatin powder, stirring for at least 2 minutes. Then add cold water as directed. If any undissolved particles remain, the final texture will be grainy rather than smooth.
Layering Technique
When adding new layers, pour slowly over the back of a spoon to prevent disturbing the set layer beneath. The spoon helps distribute the liquid gently. Always check that the previous layer is completely set (no stickiness when lightly touched) before adding the next layer.
Pro Tips for Perfect St. Patrick’s Day Jello Cups
- For cleaner layers, chill the cups at a slight angle in the refrigerator by propping up one side of the tray.
- Add a few drops of green food coloring to intensify the color if using light-colored jello varieties.
- Use clear plastic cups or glass dishes to best showcase the beautiful layers.
- For adult versions, you could add a splash of Irish cream to the milk layer.
- Garnish with whipped cream and green sprinkles just before serving for extra festivity.
- If short on time, place the cups in the freezer for 15 minutes between layers (but don’t let them freeze completely).
Variations and Adaptations
Dietary Modifications
For a sugar-free version, use sugar-free jello and replace the sweetened condensed milk with a mixture of sugar-free vanilla pudding and milk. Vegan alternatives can be made using agar-agar instead of gelatin and coconut condensed milk.
Flavor Variations
While lime is traditional for St. Patrick’s Day, you could experiment with other green flavors like green apple, kiwi, or even mint. For a more sophisticated version, try layering white chocolate mousse with the green jello.
Serving and Presentation Guide
Serve these jello cups chilled, straight from the refrigerator. For an elegant touch, place each cup on a small dessert plate with a doily underneath. Add a sprig of mint or a dusting of green sugar for extra festive flair. If serving at a buffet, consider arranging them in a rainbow pattern to play on the Irish theme.
For individual servings, 4-6 oz clear plastic or glass cups work perfectly. If making for a large crowd, you could create a jello trifle in a clear glass bowl using the same layering technique. Serve with small dessert spoons or colorful straws for a fun presentation.
Storage and Shelf Life
St. Patrick’s Day Jello Cups should be stored covered in the refrigerator. They will keep well for 3-4 days, though the layers may begin to bleed slightly into each other after 48 hours. Do not freeze as this will damage the gelatin structure and create a watery texture when thawed.
If transporting to a party, place the cups in a shallow tray with ice packs to keep them chilled. Avoid leaving them at room temperature for more than 30 minutes as they may begin to soften and lose their distinct layers.
Frequently Asked Questions
Can I make these jello cups ahead of time?
Absolutely! These are perfect for making ahead. Prepare them up to 2 days in advance and keep refrigerated until ready to serve. The flavors actually improve slightly as they sit.
Can I use different colors for other holidays?
Yes, this recipe is very versatile. Simply change the jello color to match any holiday—red and green for Christmas, red white and blue for Fourth of July, etc.
Why is my jello not setting properly?
This could be due to incorrect water measurements, not allowing enough chilling time between layers, or using expired gelatin. Always check expiration dates and measure liquids carefully.
Can I make these in one large dish instead of individual cups?
Yes, you can use a 9×13 inch pan, but individual servings are easier to serve and maintain the layered look when portioned.
Are there alternatives to sweetened condensed milk?
You could use a mixture of milk and sugar, or for a lighter version, try Greek yogurt sweetened with honey, though the texture will be different.
The Recipe
St. Patrick’s Day Jello Cups
Serves: 8
Prep Time: 15 mins
Cook Time: 0 mins
Total Time: 4 hours 15 mins
Kitchen Equipment Needed
- 8 clear plastic cups or glass dessert dishes
- Measuring cups and spoons
- 2 mixing bowls
- Whisk
- Measuring cup for hot water
Ingredients
- 2 (3 oz) packages lime jello
- 2 cups boiling water
- 2 cups cold water
- 1 (14 oz) can sweetened condensed milk
- 1 tablespoon unflavored gelatin
- 1/2 cup hot water
- 1/2 cup cold water
Directions
- Dissolve one package of lime jello in 1 cup boiling water, stirring for 2 minutes until completely dissolved. Add 1 cup cold water and stir.
- Pour equal amounts into 8 clear cups, filling each about 1/3 full. Refrigerate for 30 minutes or until set.
- While first layer chills, prepare the cream layer: Sprinkle unflavored gelatin over 1/2 cup hot water and stir until dissolved. Add sweetened condensed milk and 1/2 cup cold water, whisking until smooth.
- Once first jello layer is set, carefully pour about 2 tablespoons of the milk mixture into each cup. Return to refrigerator for 30 minutes.
- Prepare the second jello layer by repeating step 1 with the remaining package of lime jello.
- After milk layer has set, carefully pour the remaining jello mixture over the top of each cup.
- Refrigerate for at least 3 hours or until fully set before serving.
Recipe Notes
- For a more intense green color, add 2-3 drops of green food coloring to the jello mixture.
- Garnish with whipped cream and green sprinkles before serving if desired.
- For adult versions, you can add 1 tablespoon of Irish cream liqueur to the milk layer.